2010年7月30日星期五

The Spotify Song Has a Familiar Chorus: US Launch Talks Back to “Square One”

When will Spotify, the best music service Americans can’t use, finally make it to the U.S? No time soon, according to a new report from Billboard. The trade magazine says the much-hyped service has gone “back to square one” in its negotiations with the big music labels, who have licensed their catalogs for a European version but not a stateside one.

Billboard also cites sources suggesting that Spotify still hopes for a US launch this year. But Spotify has been hoping for/promising a US launch for so long that there’s a Tumblr site dedicated to cataloging those unfulfilled aspirations. It’s called Not-ify.

What gives? Ask around and you’ll hear two different theories about the holdup. They’re not mutually exclusive:

  • Spotify wants to replicate the model they have in Europe, where users can listen for free, then pay for upgrades like mobile and/or ad-free access. But the labels are no longer interested in supporting free streaming sites: Now that LaLa and Imeem have gone away, the only free on-demand service in the U.S. is News Corp.’s MySpace Music, and they don’t seem that enthusiastic about that one.
  • Spotify has raised a big pile of money from VCs, and the labels are demanding a big chunk of that for themselves.

I’m also not clear whether the holdup is with all the labels, or just some of them. Sources close to Spotify have hinted to me in the past that the company has had deals in place with some of the big four music labels for some time, but was waiting to lock up at least three of them before launching.

Then again, those same sources suggest that Spotify is willing to avoid the US altogether if it can’t get the deal it wants. Choose the story you like, I guess.

Meanwhile, if you’re itching to subscribe to a music service that lets you listen to all the music you want, without ads and on your PC and on mobile devices like Google’s Android (GOOG) handsets and Apple’s iPhone (AAPL), you’re in luck! There are plenty of options.

Go ahead and try any of the following, which offer more or less the same stuff, at the same $10 a month price point:

$10 a month too much? OK. Best Buy’s Napster (BBY) offers an ad-free, all-you-can-eat service, without mobile accesss for $5 a month. Meanwhile MySpace Music, which is co-owned by News Corp. (NWS) and the labels themselves, remains free and ad-supported. And the company’s line is that will remain so (thought it doesn’t rule out a paid option).

2010年7月27日星期二

MediaMemo by Peter Kafka The MediaMemo FeedFollow Peter on Twitter Sex, Drugs and Rock and Roll, Minus the Sex and Drugs, Plus a Big Helping of Data

You don’t often read essays about the music business–written by somebody employed by a major label, no less–that include sentences like this: “With our business, the fan experience starts becoming that which contextualizes what was known prior as an artifact.” But there’s plenty more in this post by Ethan Kaplan, who now runs the “emerging technology” unit for Warner Music Group’s sales and marketing arm. Read on for big thinky thoughts about big data and big music.

2010年7月25日星期日

How to import video from camcorder to Mac

You may be ready to make a movie after you capture great footage with your FireWire camcorder. In this condition, you need import your camcorder to your Mac. More specially, you need to connect your camcorder to your Mac, and then copy footage from the camcorder into iMovie. And when you import video into an iMovie project, it would divide your video into individual clips for the easy editing.

camcorder video to Mac

Part 1. How to Import Video from a Camcorder to your Mac
Step 1: Connect camcorder to your Mac computer with cable (USB/Wifi)
Step 2: Select mode of camcorder such as PC/Computer mode.
Step 3: iMovie will automatic open Import window.
Step 4: If DVD Player automatic open. just quit DVD Player first.
Step 5: So now, you can review your video or select "Import All"(make sure your switch is set to "Automatic").
Step 6: If you select "Manual", you can import some clip to iMovie
Step 7: If you import from Tape based device (DV/HDV), iMovie will automatic revise tape and import all
Step 8: iMovie automatic create thumbnail video after complete import

Part 2. Tips:
iMovie automatically detects your camcorder
iMovie will automatically detect when you have a FireWire camcorder connected. If you see the message No Camera Attached, make sure your camera is turned on and properly plugged in to your computer via a FireWire cable and that your camcorder is set to VCR, VTR, or Play mode. You can also click the Connection Help button for more suggestions.
iMovie supports different video formats
When you create your project, choose the appropriate video format depending on your needs. For importing video from your camcorder, choose between DV, DV Widescreen, HDV 1080i, and HDV 720i. For recording from your iSight, select iSight. If you will be copying MPEG-4 files from your PDA or phone, select MPEG-4.
Import directly to the iMovie timeline
You can import footage directly from your camcorder to the iMovie timeline rather than to the Clips pane. This is a quick and easy way to get your footage into your iMovie project. You can then edit right in the timeline. From the iMovie menu, choose Preferences, click Import, and then choose the option Place clips in Movie Timeline.
If you're importing video that is already edited
Instead of importing your video as separate clips, you can set iMovie to import your video as a single clip. This may be useful if you're importing a movie that you've already edited and you just want to change a small portion. From the iMovie menu, choose Preferences, click Import, and then deselect the "Start a new clip at each scene break" option. If you prefer, select "Limit scene length to" and set a limit for the number of minutes. This will ensure your imported files don't get too large, in case you'll be copying clips between iMovie projects.
What you need to make a high-definition video with iMovie
High definition video is quickly becoming the format you see broadcast on TV. An HD camcorder stores more pixels than a standard camcorder, letting you see more detail in your video footage. iMovie supports importing and editing video from HD camcorders (HDV 720p and 1080i), so you can make movies just like the pros-and it's a great way to archive your most precious life events in the highest resolution possible .
Using video from an MPEG-4 camera
Many digital still cameras, PDAs, and mobile phones let you record short videos in the MPEG-4 format, a standard compression that is used to significantly reduce the file size of video. While iMovie doesn't know how to import video from these devices directly, as it does with FireWire devices, you can still use the MPEG-4 files once you've copied them to your Mac. Just drag them into the iMovie Clips pane using the Finder or import them using Import from the File menu.
Monitor the remaining amount of hard disk space
Digital video clips use a large amount of hard disk space. For example, five minutes of DV footage uses approximately 1GB of space. The same amount of HD video can occupy between 2GB to 4GB, depending on the format and footage. To save hard disk space, import and edit your video in sections instead of trying to do so all at once. You can see how much space remains on your hard disk by using the monitor located in the lower-right corner of the iMovie window.
Using video from your connected or built-in iSight camera
You can record video directly into your iMovie project with your iSight camera. That’s to say, you can add clips to your project spontaneously while you're working on it. Just connect your iSight camera to the FireWire port of your Mac and you're ready to start recording. If you have more then one camcorder connected, such as a camcorder and an iSight,- or you have an iMac with a built-in iSight-choose iSight from the pop-up menu that appears when you switch to camera mode.

Three Ways to Download Music To Your Zune Player

There are several ways you can download your Zune movies, Zune music videos, Zune MP3's and Zune software to your Zune player.
1) The first is from the Microsoft Zune Marketplace and other Pay-Per-Download Sites which have movie downloads, music downloads, music video downloads, and more. The problem with downloading Zune files from places like Microsoft Zune Marketplace is the cost. The Microsoft Zune Marketplace charges a monthly subscription service called the "Zune Pass" with unlimited downloads for $14.99 per month. The pay-per-download sites charge on the average about $1.00 per Zune download. So, with a Zune player that has a 30 gigabyte hard drive whic allows users to store up to 7,500 Zune MP3s, 2,500 pictures or 100 hours of Zune movies and Zune music videos, that is going to cost a fortune to fill up.

2) WiFi - Microsoft Zune players has a technology called WiFi which allows friends and family to share Zune music, Zune movies, Zune software, pictures and Zune music videos both effortlessly and wirelessly. If you have a cool picture or something you found on a zune download site you can share it easily. Anytime you come in close range of another Zune player you can connect to that Zune player via WiFi and share your Zune downloads. The only drawback is you can only play a shared song only 3 times before it is deleted although, pictures are saved and can be viewed many times. It's a nice feature but needs improvement.

3) The third way is by ripping your music CD's to your Zune player. The definition of ripping means converting CD music files to a file format usable by your Zune player which is either in MP3 or WMA file format. After doing this, all you need to do is plug your Microsoft Zune player into your computer with a USB cable and transfer the ripped music files to your Zune player using the provided Zune software.

1. Put the music CD that you want ripped into your PC.
2. After the media player opens. Select the song you would like to copy and click on RIP.
3. Save the song you just ripped to a folder of your choice.
4. Plug in your Zune Player to your PC using the USB Cable. The Zune Software will automatically search for music that you saved in the folder on your PC. Select the files you want and manually drag and drop them into your Zune player's music folder.

Related theme:
New Zune review part 2-1
New Zune review part 2-2
New Zune review part 2-3
New Zune review part 2-4

Recommended Products:
DVD to Zune Converter
This Zune Converter can convert or rip DVD to what you want video/audio formats.
Zune Movie Converter
It supports convert video to Zune supporting video and audio format.

2010年7月22日星期四

Put Limewire music, YouTube video on iPod

1. Put music and videos from Limewire to iPod
Limewire is a download tool I assume lot of us use. I often use it to download free music and videos and put them on my iPod. I also often visit Youtube to watch videos and sometimes I download videos from Youtube to put on my iPod.
Search and download songs from Limewire. You may get songs in all sorts of formats, but not all formats are supported by iPod. Usually I select three formats: MP3, AAC and M4A formats that are supported by iPod and can be directly transferred to iPod using iTunes. For the detailed specs info, you can visit http://www.apple.com/iPod/specs.html. After you download the songs, open your iTunes, click "File" from the upper left corner, select "Add file to library", browse your computer hard drive and find the songs downloaded by Limewire, select the songs you prefer, click OK and the songs will be put in your iTunes. Then you can just transfer the songs to your iPod from iTunes.

2.Youtube video to iPod
I often visit Youtube to watch videos and sometimes I download videos from Youtube to put on my iPod. Youtube videos are in FLV formats, so I use a free online FLV converter to do the conversion:
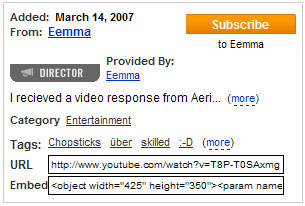
Firstly, go to Youtube and open the page of the video you want to put on your iPod. And you will find the Youtube URL of this video to the right of the playback window. Then copy this URL. See the highlighted area in the figure below:

put Limewire music, YouTube video on iPod

Secondly, go to http://vixy.net/ , paste the copied URL into the URL field of this web page, and select "MP4 for iPod/PSP" from the "Converts to" drop-down list. Then click "Start" below this list to start the conversion. See the highlighted areas below:

put Limewire music, YouTube video on iPod

Finally, after the conversion, this website will provide a download link for you to download the converted MP4 file. When you see the link, you can just download the final file from the link, save the downloaded MP4 file on your computer and use iTunes to sync it on to your iPod.

Recommended Products For you:
DVD to iPod Converter for Mac
It's a specially designed iPod conversion program to Convert DVD to iPod touch, iPod classic, iPod nano, convert DVD to iTunes on Leopard.
DVD to iPod Converter for Windows
It is one of the best conversion programs for PC that can put DVD on iPod touch, iPod classic, iPod nano and so on.

2010年7月21日星期三

Reddit Gold Offers “Friends With Benefits”

Reddit’s earnest plea for financial help from its members last week worked so well that it’s decided to create a permanent subscription-level product with discrete benefits and requirements. Reddit Gold offers subscribers control over whether or not they see ads, userpage sorting and “Friends with Benefits,” the ability to add notes on friends. The subscription fee varies (exact details here), but is generally $4 per month.

2010年7月20日星期二

Sumner Redstone’s Many Gigs: Viacom Chairman, Girl-Band Promoter, Leak Plugger!

Maybe Sumner Redstone has too much time on his hands.

Last month we learned, from the Daily Beast’s Peter Lauria, that the Viacom (VIA) chairman was moonlighting as a talent promoter: Redstone was reportedly trying to get his MTV channel to run an unwatchable reality TV show about the Electric Barbarellas — a “scantily clad new all-girl group” the octogenerian was supposedly “smitten with.”

Now we learn, from Lauria as well, that Redstone is working on a new project: Trying to figure out which Viacom employee leaked last month’s story to Lauria.

2010年7月19日星期一

Photo Ad Network Pixazza Rounds Up Another $12 Million

Pixazza, a two-year-old startup that likes to describe itself as “AdSense for photos,” has raised another $12 million in a Series B round led by Shasta Ventures. The previous investors in its $5.75 million A round have also re-upped.

The AdSense comparison is a nice hook for the Mountain View based company, particularly because Google Ventures (GOOG) is one of its investors. But perhaps a more accurate analogy would be a company like Vibrant, which lets publishers turn text on their pages into clickable ads.

In this case, the images Pixazza works with become hyperlinked to e-commerce opportunities: Want to buy the boots in this photo? Click here. Etc.

In any case, you can read more about the Pixazza here. For the record, the company says its publisher network now attracts 25 million unique visitors a month, and serves up 8 billion image impressions a year.

2010年7月18日星期日

How to Rip DVDs to iPod, iPhone, etc. with Handbrake

Do you want to watch your DVDs on your iPod, iPhone or Apple TV? Here's a guide which explains how to use an excellent software - Handbrake to rip DVD's into MPEG-4 video files.

Requirements:
1. VLC player (Handbrake 0.9.3 and higher)
2. iTunes 6.0.1 or later
3. QuickTime 7.0.3 or later
4. 500 MHz processor or better with at least 16MB of video RAM
Step 1: Download Handbrake
Download Handbrake from here and install it. Handbrake is free. If you already have Handbrake installed, please check to see if your version is out of date. Several new improvements have been made recently to the program, specifically for the iPod and iPhone.

Download Handbrake

Step 2. Insert DVD
Grab a video DVD and put it into your computer. Handbrake can only convert standard video DVD's that you would normally play in a DVD player. If you have a DVD-ROM with video files saved on it as individual files (AVI, MPG, WMV, MOV, etc), Handbrake will NOT be able to convert these files. Handbrake only wants standard video DVD's.
Depending on your computer's preferences, the DVD Player application might automatically open. If it does, just quit it. Only one application should be accessing the DVD at a time.
Launch Handbrake. A screen asking you to select a DVD will appear. Select the DVD you've inserted into your computer and press the Open button.
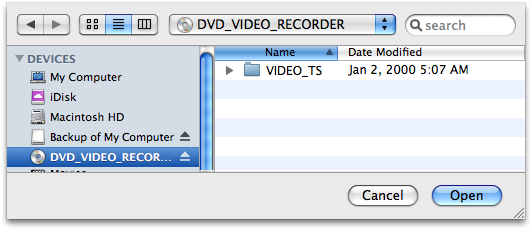
Insert DVD

Step 3: Download VLC player
What version of Handbrake are you using? As of version 0.9.3, Handbrake will no longer natively rip DVDs. Weird right? I wonder if they were getting some pressure from the movie industry. But don't give up on Handbrake just yet. You can still use Handbrake 0.9.3 to rip DVDs, you just need to install VLC on your machine first.
If you see the VLC screen like the one shown below, then you need to download and install VLC.

VLC on Mac

VLC Download Page:
http://www.videolan.org/vlc/

The VLC media player is a highly portable multimedia player for various audio and video formats (MPEG-1, MPEG-2, MPEG-4, DivX, mp3, ogg, etc.) as well as DVDs, VCDs, and various streaming protocols. It can also be used as a server to stream in unicast or multicast in IPv4 or IPv6 on a high-bandwidth network. Handbrake now uses some components of the VLC player and it must be installed if you want Handbrake to read DVDs.
After you download VLC, you need to install it on Mac:
VLC for Mac OS X is distributed as a disk image. Download the .dmg file, open it, and copy VLC to your hard drive (for instance the /Applications folder). Open VLC by double-clicking on it.

Step 4: Source Settings
Handbrake will now scan your DVD. This makes take up to a minute or two depending on the contents of the DVD and the speed of your optical drive.

scanning

Title: By default, Handbrake will select the longest title in the list. However, this may not be the content you want.
Movies: If you are ripping a movie, the longest title is usually the main feature.
TV Shows: If you are ripping a DVD containing TV shows, you should see a list of several titles all about the same length. The shorter titles on the DVD are usually the video backgrounds used in the DVD menu screens and DVD extras like movie trailers. Unless you are a graphic artist, you probably don't want these tracks.
The shorter titles on the DVD are usually the video backgrounds used in the DVD menu screens and DVD extras like movie trailers. Unless you are a graphic artist, you probably don't want these tracks.

Title

If you only want to rip one title but aren't sure which one, you can click on the Picture Settings button (bottom right of the Handbrake interface) and manually step through several frames of the title to see what it looks like.
NOTE: Sometimes Handbrake is unable to see every track on a DVD. We've noticed issues with very old DVD's from the mid-1990s (before the days of fancy menus and Bonus features) and some newer DVD's like Stealth. There are different techniques and methods to authoring DVD's Sometimes the tracks get nested in weird ways that prevents Handbrake from seeing them. Other DVD ripping applications like Mac The Ripper and OSex might be able to see these tracks. Look for the longest track. That is probably the main feature.

Step 5: Destination Settings
The Destination section has 3 settings you can modify: file format, codec and file destination.
File Destination: You can name your file and choose its destination using this box. Try to pick a location that has sufficient disk space to store the ripped file. On average, you need about 1 GB per full length movie.

File Destination Settings

Step 6: Select A Preset
Handbrake has a variety of handy DVD ripping presets for iPod, iPhone, Apple TV, Xbox, Sony PSP and many more. Just select a preset and Handbrake will automatically fill in all the settings for you.

Preset

If you plan on watching this DVD on your iPod, iPhone or even Apple TV, we suggest you select iPod High-Rez and drop the average bitrate to 900 kbps. This will give you a nice high quality file that will work on both big (HDTVs) and small screens (iPod/iPhone) and won't take up a ton of hard drive space.
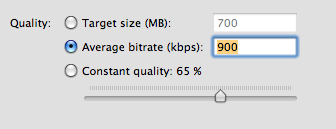
Handbrake - quality

Step 7: Picture Settings
Click on the Picture Settings button to launch a separate window. The only thing you really want to do here is to compensate for interlaced or grainy, compressed looking video. Handbrake will have adjusted everything here for you based on the preset you selected.
Sometimes video files will have horizontal lines in them. This is called interlacing. To get rid of interlacing, try turning on the Deinterlace option and select "Fast." The image below is animated and will toggle between when the deinterlace option is turned on or off. You can really see the difference around the edge of the flipper.
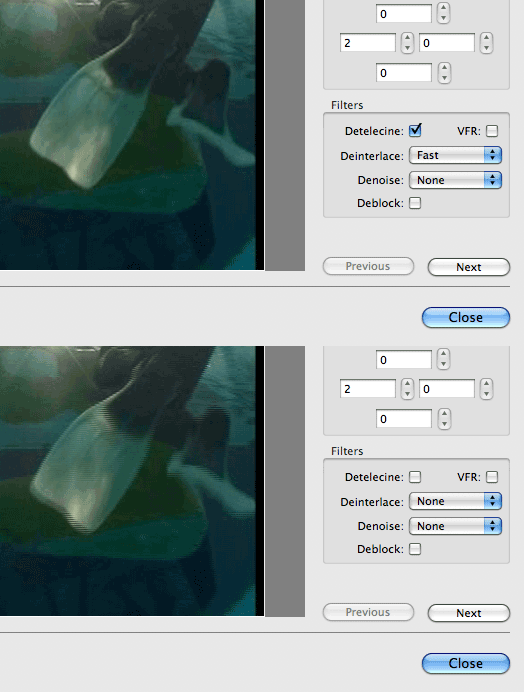
Handbrake - deinterlace

Denoise will help get rid of graininess and Deblock will help clean up blocky or compressed looking video. Experiment and try to make your video clip look the best possible.
NOTE: Your iPod really only wants video files that are 320 pixels wide by 240 wide. If you don't plan on watching this ripped DVD on anything else, you can mess around with the settings. Turn on the "Keep aspect ratio button" and decrease the Width until it says 320. Handbrake will auto-adjust the height to match the width. If your video source is 3:4 (full-screen), the height will be 240. For wide-screen content, the height will be a lower number. This is fine and isn't something to worry about.
But if you plan on watching this video on your TV with an Apple TV or an iPod Video dock, then you should keep the video size big. If you don't have the money for an Apple TV, there's this amazing iPod video dock called the Keyspan TuneView. If you want to hook your iPod Video up to your TV, you should check out the TuneView.
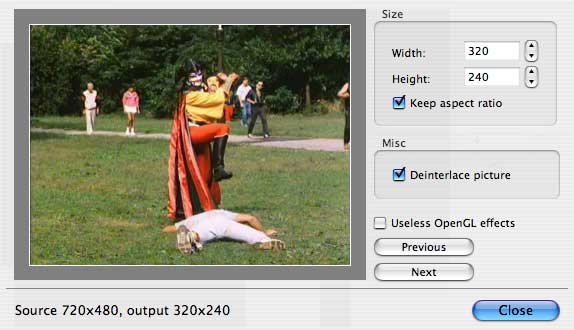
Handbrake - size

Step 8: Rip
Finally! Click on the Rip button and stand back. The encoding time will depend on several variables including: the duration of the video file, the speed of your computer, what other activity your computer is currently doing, the codec you selected (H264 or MP4) and if you decided to do a 2-pass encoding or not.

Handbrake - encoding

Handbrake will attempt to provide you with an ETA. The time will increase if you Pause the encode or do anything that will hog the processor like start a 3D render in Maya. We suggest you do your DVD ripping overnight or at a time when you don't need to use your computer.
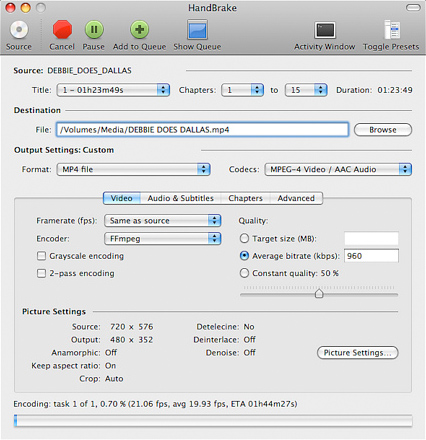

Handbrake

Step 9: Import Into iTunes
Connect your iPod Video or iPhone to your computer using the cable it came with and open iTunes (Applications > iTunes).
Drag and drop the video file into your iTunes library, or select Add to Library... from the File menu.
Make sure the video file you just added to iTunes is in a Playlist that will get synced to your device.
Select "Sync"
The sync may take a few minutes. Once the import completed, you could find the file which is ripped by Handbrake on your iPod or iPhone.
2010年7月16日星期五

How to Rip DVD to iPod Touch, iPod Nano Converter on Windows, Vista and Mac

The software you will need: DVD to iPod Converter Windows(DVD to iPod Vista) and DVD to iPod for Mac.
This guide will show you how to rip DVD to iPod Touch with these iPod Nano Converter.
The following video and audio formats are supported by iPod Touch/iPod Nano: H.264, MPEG-4, MP3, AAC, WAV. So for you enjoy DVD on iPod, you need to convert DVD to these formats.

Part One: How to rip DVD to iPod Windows, DVD to iPod Vista
Part Two: How to rip DVD to iPod Mac

Part One:
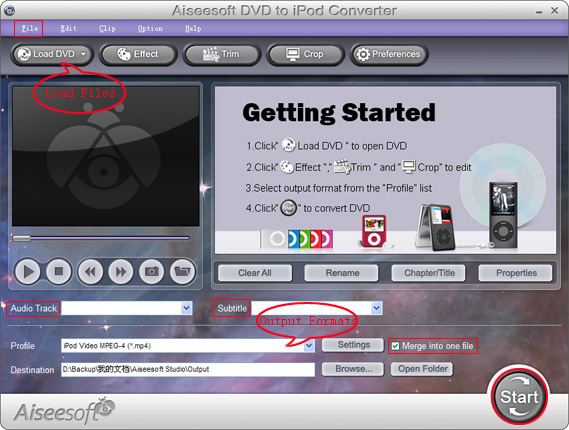
1. Download Aiseesoft DVD to iPod Converter Windows(DVD to iPod Vista), then follow the instructions to install and run it.

iPod Nano Converter

2. Click "Load DVD" to load DVD, DVD Folder or IFO files.
3. Click "Profile" to set the exact output format. Click "Settings" to set the exact parameters for your iPod. Select "Audio Track" and "Subtitle" for the output file.
4. After finishing all the pre-settings, click "Start".

Part Two:
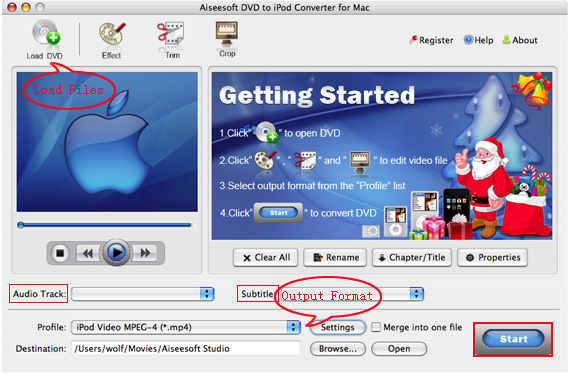
1. Download Aiseesoft DVD to iPod Mac (Intel, Power PC). Install and run it.

DVD  to iPod Mac

2. All the process are the same as DVD to iPod Windows.

Tips:
1. Click "Effect" to make special effect for your video.
You can adjust Brightness, Contract, Saturation of the video and the adjust the volume of music.
2. "Trim" function is for you to select the clips you want to convert.
3. Cut off the black edges of the original video and watch in full screen on your iPod using the "Crop" function.
4. This software allows you to join several DVD chapters into one clips by using "Merge into one file".

2010年7月11日星期日

How to use DVD decypher to rip DVD to iPod, PSP, PowerPoint etc on PC

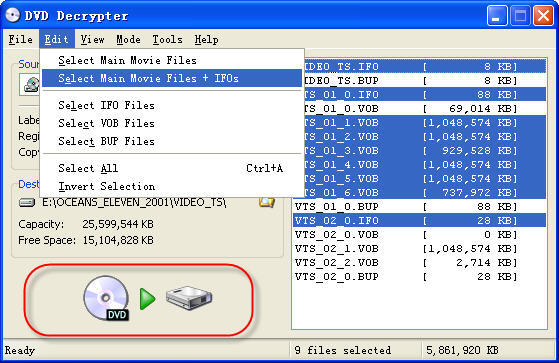
1. Use DVD decypher to rip DVD to VOB files.
DVD Decrypter is a free DVD ripper that can create backup disc images of the DVD-Video structure of DVDs. It can be used to image any DVD, but controversially it is especially useful for decrypting copy-protected movies. The program can also burn images to disc. CSS decrypting software (such as DVD Decrypter, AnyDVD, Smartripper, and DVD Shrink) allows a region-specific DVD to be copied as an all-region DVD. It also removes Macrovision, Content Scrambling System (CSS), region codes, and user operation prohibition.
Step 1. Install DVD decypher
Download it from: http://www.dvddecrypter.org.uk/. To install DVD decypher, simply mount the .exe archive by double-clicking it, and setp by step to click "next".
Step 2. Rip DVD using DVD decypher
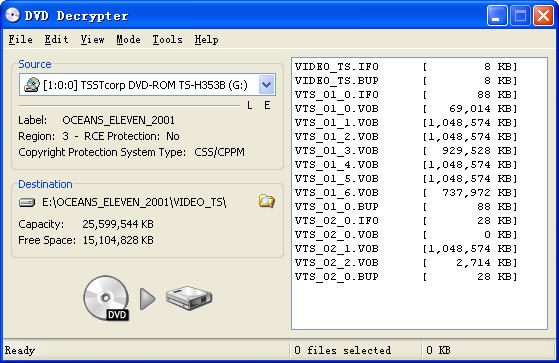
After you insert a movie DVD into your DVD burner or player, launch DVD Decrypter. In the window to the right you will see all the files on that DVD.DVD decypher

NOTE: If the files are not shown in the right window pane, on the Task Bar, click on Mode and click on FILE F to place a checkmark beside it as shown in the picture above.
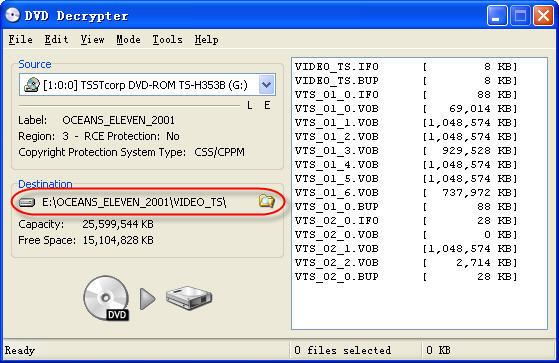
You can choose the output folder by:
Under "Destination", click on the Folder out to the right of the movie path, locate the folder you want to rip the DVD to, then double left click on folder to open it then click OK.

DVD Decrypter

You can select to rip the whole DVD or choose to rip a segment of the DVD.
Explanation:
.IFO = The IFO files includes information such as chapters, subtitle tracks and audio tracks.
.VOB = The VOB files contains the actual video, audio, subtitles and menus.
.BUP = Backup files of the IFO files.

DVD Decrypter - file explanation

Step 3. Finish conversion
Click on the Hard Drive Symbol to the right of the green arrow. After clicking on the Hard Drive Symbol, you will have the screen which shows the decryption in progress.
After conversion by this free DVD ripper, you can find the VOB files in the "Destination".

2. Convert the .VOB files to video formats compatible with iPod, iPhone, PSP, PowerPoint, etc.
Now you need to use Aiseesoft Total Video Converter to convert .VOB files to formats compatible with popular players such as iPod, iPhone, Apple TV, PSP, etc. You can also upload the converted files form DVD (.VOB) to YouTube, Myspace, and other video sharing site. YouTube accepts a wide range of video file formats such as .WMV, .AVI, .MOV, and .MPG, etc. PowerPoint understands mpeg, asf, avi, wpl. wm, wmx, wmd, wmz, dvr-ms, mpv2, mp2v, mov, etc. If you want to put the VOB files on PowerPoint, you can choose .avi as output format.
Step 1. Download and install Aiseesoft Total Video Converter.
Step 2. Run Aiseesoft Total Video Converter, click "Load DVD" button to import the .VOB files, choose the output format, then click "Start" to start the conversion, the default setting works perfectly.

Total Video Converter

Step 3. After conversion finished, you can use transfer the converted files to the players.
For example :
use iTunes to transfer the mp4 video to your iPod, here are the steps:
1). Open iTunes and click "File" to add your converted videos to iTunes library.
2). plug in your iPod to computer, then iTunes will detect your iPod as a device.
3). Select your iPod device on the left panel of iTunes, click "Movies" tab, check the videos you want to sync and click "Apply", done.
Use Zune software to transfer wmv video to Zune player, here are the steps:
1). Install Zune software, you can download it from here for free: http://www.zune.net
2). Plug in your Zune player to computer
3). Drag the wmv video to Zune library
4). Click "start sync" to sync your Zune. OK.
Tips: Aiseesoft DVD Ripper can rip DVD to all popular video and audio formats directly. It can rip DVD to videos including MP4, AVI, M4V, 3GP, MPG, MPEG, FLV, etc; and it can convert DVD audio to MP3, M4A, AAC, AC3, etc. And it is more easy to use than Mac the ripper. You can have a try.

2010年7月9日星期五

LeBron James and the Giant Twitter Link

What happens when a really popular person posts a Web link on Twitter? They make a lot of traffic! So what happens when LeBron James posts a Web link on Twitter?

He makes a lot of traffic–and that traffic doesn’t go away.

While some of you (all of you?) wait for James’s ESPN non-news conference tonight, here’s some data to chew on, courtesy of bit.ly, the Web link shortening folks, and betaworks, bit.ly’s Web incubator parent.

Betaworks’ Isaac Greenbaum has spent the past day analyzing this bit.ly link–http://bit.ly/apxlxx–that James posted yesterday via Twitter. Here’s what the traffic from that link, which takes you to James’s personal Web site, looked like in the first hour after he posted it (click image to enlarge):

The big spike isn’t unusual for a popular bit.ly link. The impressive part, Greenbaum says, is how much traffic the link continued to generate after the first rush. Even now, he says, a day after the posting, the link is generating some 50 clicks a minute. That’s a torrent for a day-old link.

More data (click to enlarge):

What’s really interesting here is that while James is big on Twitter, he isn’t that big–he’s just under 320,000 followers for now. That’s in part because he just went on a couple of days ago, and in part because he never got the “Suggested User List” nod from Twitter that generates those crazy one million-plus follower numbers.

But most of the people who do get on that list eventually figure out that no one really has that many people reading their tweets–they just have a lot of people following their account. And most of them aren’t really “following” at all. Big difference.

So Greenbaum’s real takeaway is that all of James’ Twitter followers are really, really interested in what he has to say. Yep!

But here’s my own prediction, made without the benefit of any analytics at all: People will start becoming a lot less interested in what James has to say in a few hours.

2010年7月6日星期二

App Watch: PBS Sees Potential in iPhone as Children’s Toy

For many kids growing up in a world of gadgets, Apple’s (AAPL) iPhone is little more than a cool toy.

Never mind the price tag or the fact that the phone helped revolutionize mobile devices. Kids like to poke around on the screen and watch animation. And many parents have found that the gadget can be a great diversion, if they can get over their fear of their children breaking the device.

A whole category of applications has sprung up for very young children who play on mobile gadgets. And PBS Kids, the children’s division of the Public Broadcasting System, is aiming to do for this medium what it did with educational programming on television.

“Our specialty has always been in informal education,” said Lesli Rotenberg, the senior vice president of children’s media at PBS. “We can make a really big difference even when kids aren’t in school.”

Read the rest of this post on the original site

Remember Merton, the Chatroulette Piano Guy? He’s Still Here!

Remember “Merton”, ChatRoulette’s breakout star? The funny improv piano player who wasn’t Ben Folds but who inspired Ben Folds to create his own Merton tribute and…

Hrm. This seemed like super-interesting stuff a few months ago. But ChatRoulette’s buzz, and perhaps its traffic, is dying down. And while Merton is still a little mysterious — unless I’m missing it, he has yet to actually identify himself — he’s no longer of the moment. And when he puts out a new video, no one cares.

OK, so not no one — this clip, Merton’s third, has racked up more than 336,000 views since Friday. But here’s a telling data point: Mashable, the reliable chronicler of all things Merton, has yet to acknowledge the new clip.

The good news for Merton is that may be able to extract a few dollars out of this thing before it goes away completely. If you watch the clip below (there is indeed some swearing) or visit his channel on Google’s YouTube (GOOG), you’ll see he’s started selling ads on this stuff. Hurry up!

2010年7月5日星期一

How to Rip DVD, Convert Video to iPhone, backup iPhone info, make iPhone Ringone For Windows/Mac

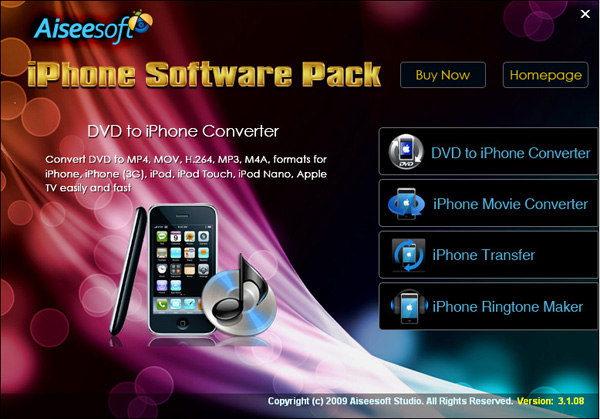
Recently, iPhone has became a really important part of our life. People use it to make a phone call, enjoy music and movies/videos, and play games. Today I will share you a really nice software pack, which can convert DVD and video to iPhone video/audio formats, backup iPhone info on your computer, and make iPhone ringtone easily.

What you need is just this nice Convert DVD Video to iPhone software

iPhone Software Pack

Part 1: How to convert DVD movies to iPhone
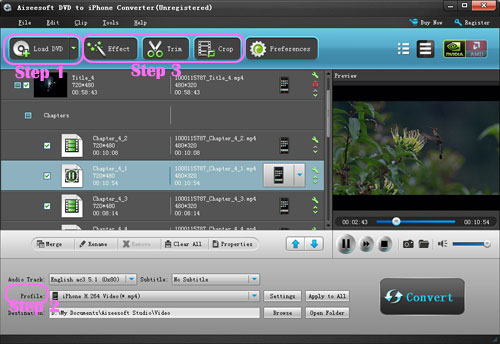
Use Aiseesoft DVD to iPhone Converter.

DVD to iPhone Converter

Step 1: Load DVD
Put your DVD in your DVD Drive and click “Load DVD” button

Step 2: Choose output profile and Settings
You can choose your output profile in the drop-list when you click profile list.
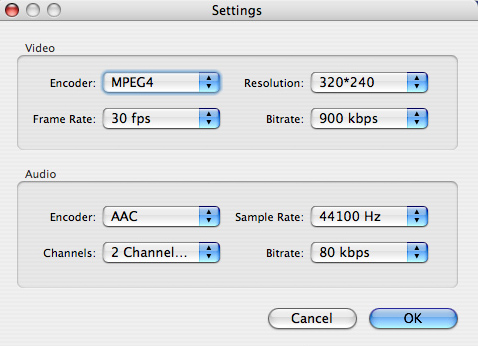
You can also adjust your settings, such as Resolution, Bitrate, so on.

Step 3: Edit Video
You can do “Trim”, “Crop”, “Merge into one file”and other video editing functions to make your video more enjoyable.

Click “Start” to begin you conversion. After few mins you can enjoy your DVD movies on your iPhone.
Part 2: How to convert videos to iPhone with iPhone Movie Converter

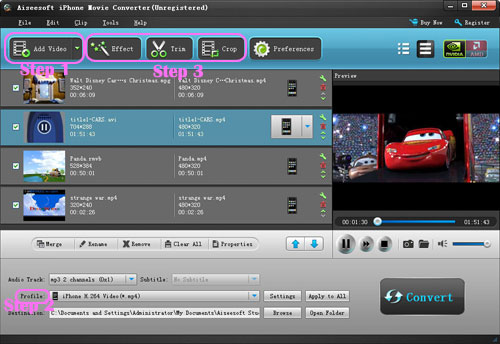
iPhone Movie Converter

Step 1: Add file
Click “Add File” button to add your video you want to put on your iPhone.
Step 2: Choose output profile and settings
You can choose your output profile in the drop-list when you click profile list.
You can also adjust your settings, such as Resolution, Bitrate and Encoder and so on.

Step 3: Edit Video
You can do “Trim”, “Crop”, “Merge into one file”and other video editing functions to make your video more enjoyable.

Click “Start” to begin you conversion. After few mins you can enjoy your videos on your iPhone.
Part 3: How to transfer songs and vdieos from iPhone to computer, from computer to iPhone and from iPhone to iPhone.
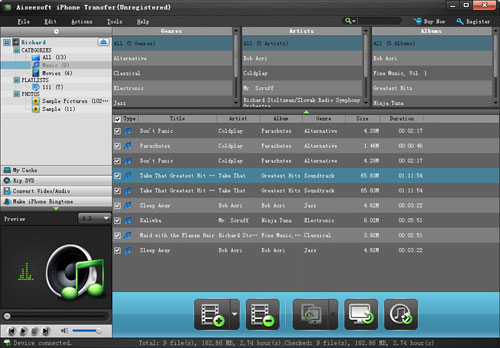
iPhone Transfer

Step 1: Click iPhone Transfer
Click “Computer to iPhone”(1) button, it will allow you to transfer songs and videos from your computer to iPhone easily.
Click “iPhone to Computer”(2) button, it will allow you to backup your songs and videos from iPhone to your computer.
Click “iPhone to iPhone”(3) button, it will allow you to transfer songs and videos from one iPhone to another iPhone dirrectly.

Part 4: How to make your own iPhone ringtone

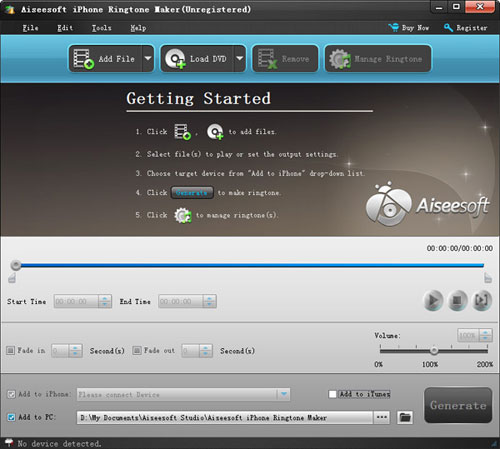
iPhone Ringtone Maker

Step 1: Click iPhone Rigntone Maker and click “Browse” on the right side of "Input File" to import the file that you want to make ringtone from i.t

Step 2: Play it and listen the music to find the segment that you want to use it as ringtone. Then drag and click the start& end slider to set your wanted segment, or type the start & end time in the corresponding text box directly to get the exact segment. You also can pre-listen the converted audio before generate.
Step 3: Click “Browse” on the right side of "Local Output Folder" to choose the output destination.

Step 4: Check "Export to iPhone" option, the converted ringtone will be load to your iPhone directly.

Step 5: After all the settings are finished, click “Generate” to begin making your own iPhone ringtone.

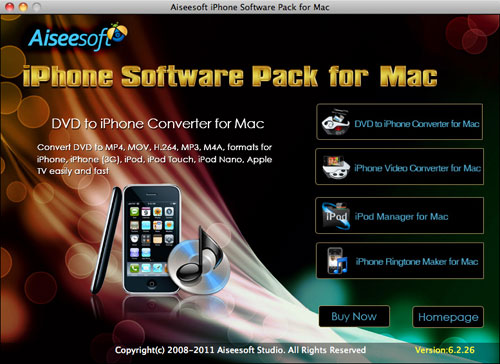
For Mac users I recommend you Aiseesoft iPhone Software Pack for Mac

Using Aiseesoft iPhone Software Pack for Mac, you can convert any video/DVD to iPhone Mac, backup the audio, video files on iPod to Mac and import audio, video files or folders from Mac to your iPod without iTunes with the help of iPod Manager Mac, even make iPhone ringtone from AVI, MPEG, WMV, MP4, FLV, MKV, H.264/MPEG-4, DivX, XviD, MOV, RM, RMVB, MP3, WMA, AAC video and audio sources on Mac.

iPhone Software Pack for Mac

2010年7月4日星期日

How to reformat an iPod

This is a tutorial about how to reformat Windows Formatted iPod for Mac and how to reformat Mac Formatted iPod for Windows. There are 2 parts:
Part 1. How to reformat Windows Formatted iPod for Mac
Part 2. How to reformat Mac Formatted iPod for Windows

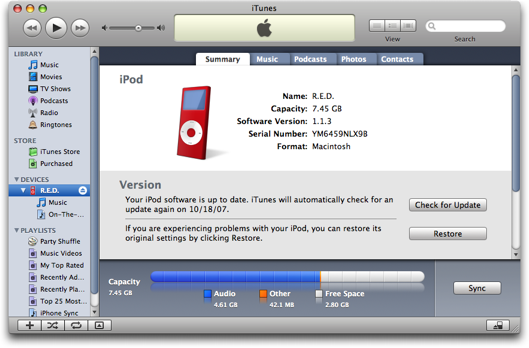
The way you see if an iPod is Mac or Windows-ready is to go to Settings --> About and scroll to the bottom of the screen. If it's formatted for Mac OS X, then the last item will be the serial number of the iPod. If it's Windows-ready, then after the serial number will be "Format: Windows". Simple enough, if a bit obscure.
If you wish to keep the songs you have on the iPod, you must first follow this tutorial to backup your iPod files to your computer.

Part 1, How to reformat Windows Formatted iPod for Mac
Step 1 Launch iTunes by selecting its icon in the dock
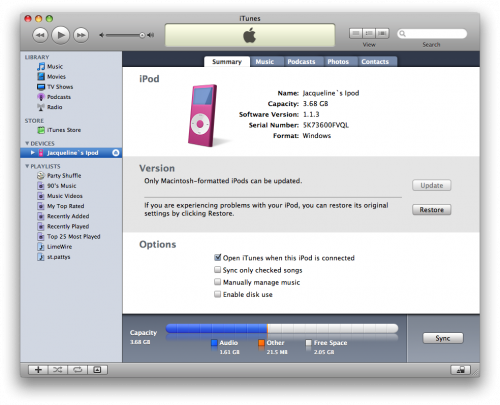
Step 2 Connect your iPod to the computer. Once it shows up in iTunes press the Restore button under the Summary Tab.

reformat windows formatted iPod

Step 3 A popup will appear warning you that all the songs on your iPod will be erased. Click the Restore button.
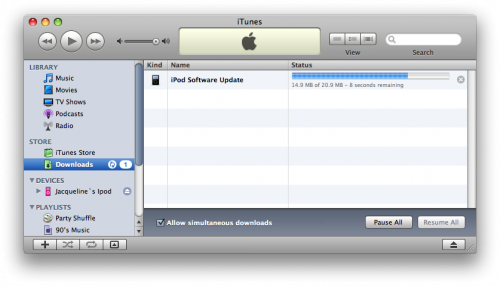
Step 4 An iPod Software Update window will open. Click the Next button.
Step 5 Click the Agree button to accept the license agreement.
Step 6 iTunes will now go and download the latest firmware for your iPod.

reformat windows formatted iPod

Step 7 Once installation begins it will ask you for an Administrator's username and password. Enter this information then click the OK button.
Step 8 iTunes will then format and update your iPod after which it will reboot.
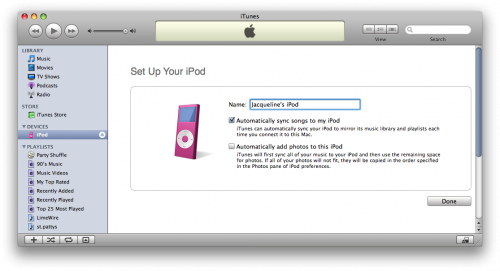
Step 9 Once complete you will be asked to name your iPod. Do this then press the Done button.

reformat windows formatted iPod

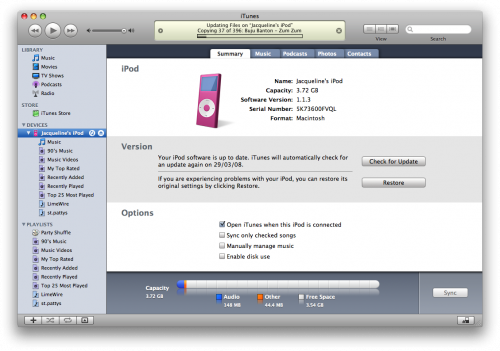
Step 10 iTunes will now automatically begin syncing your library to the iPod!

reformat windows formatted iPod

Part2. How to reformat Mac Formatted iPod for Windows
Step 1, Download the latest version of iTunes
Your first step should be to ensure that you have the very latest version of iTunes. You can do that by going to Download iTunes. Install that, and when you hook up your iPod, you should see it show up in iTunes, then when you click on the iPod on the left side of iTunes, you'll get to the summary screen.

iTunes

Step2 , Click the "Restore" button and you should be prompted to choose between four different options:
Restore Option 1: Restore - Restores with same iPod Software version already on iPod.
Restore Option 2: Use Same Version - Restores with same iPod Software version already on iPod even though a newer version is available.
Restore Option 3: Use Newest Version - Restores with the latest iPod Software available.
Restore Option 4: Restore and Update - Restores with the latest iPod Software available.

2010年7月2日星期五

How to use Mac TS converter to convert TS to MP4, MOV, etc on Mac OS X

What is TS?
Transport stream(TS, TP, MPEG-TS, or M2T) is a communications protocol for audio, video, and data which is specified in MPEG-2 Part 1, Systems (ISO/IEC standard 13818-1). Its design goal is to allow multiplexing of digital video and audio and to synchronize the output. Transport stream offers features for error correction for transportation over unreliable media, and is used in broadcast applications such as DVB and ATSC. It is contrasted with program stream, designed for more reliable media such as DVDs.
TS format is a container format that encapsulates pocketsize elementary streams and other data.
Important elements of a transport stream: Packet, PID, Programs, Program Specific Information (PSI) , 1 PAT , PMT , PCR , Null packets

How to play TS files on Mac?
You need media player to play TS files on Mac OS X:
VLC media player is a highly portable multimedia player for various audio and video formats (MPEG-1, MPEG-2, MPEG-4, DivX, mp3, ogg, ...) as well as DVDs, VCDs, and various streaming protocols. It can also be used as a server to stream in unicast or multicast in IPv4 or IPv6 on a high-bandwidth network. It supports Mac, linux, Windows.
How to convert TS to MP4, AVI,MOV, etc on Mac?
You need a video converter for Mac to convert TS to MP4, AVI, MOV, etc on Mac. Then you can put them on iPod, iPhone, PSP, Xbox 360, iMove, other potable players.
Step 1: Download TS Video Converter for Mac:
We recommend you Aiseesoft Video Converter for Mac which can convert TS to MP4, Convert TS to AVI perfectly. This Mac TS Video Converter also can extract audio from TS and Convert to MP3, M4A, etc. Compared with other video converters, this TS video converter for Mac provides you with better output quality, more advanced functions and higher conversion speed. You can download free trial Version here: for Mac intel users, for Mac PowerPC users. Then install and run this program. The trial version should be fully functional for what you want to do.
Step 2: Load the TS files you want to convert

Video Converter for Mac

Click the "Add File" button to browse your computer hard disc and add the .TS files you want to convert to the program.
Step 3: Output Settings
After you added TS files, you can select an output format for each video file and specify a directory on your computer to save the output files.
The TS Converter for Mac supports comprehensive video formats including AVI, MPEG, WMV, MP4, XviD, 3GP, FLV, etc.
If you don't know what formats your device supports, you can just select the format according to the device name. Of course, if you don't want to use the default video and audio encoding settings, just click the "Settings" button to customize these settings.

Video Converter for Mac - settings

Step 4: Edit your TS files
This TS Video Converter for Mac set video brightness, contrast, saturation, crop video, trim video/audio and even merge multiple files into one file.

Step 5: Start the conversion
Click the Convert button to start conversion and then you can just go out for a walk or take a nap, and the conversion may have been finished when you come back: )

Modifications of transport stream specification for random-access media (M2TS)
Transport Stream was designed for tape and broadcast, but it required modifications for usage with random-access media devices like new generation of digital camcorders that record onto DVD disks, hard drives or solid-state memory cards.
Random-access based systems may save data packets into a temporary buffer if a storage device is not ready, for example on device startup. Packets are written out of order, and to keep track of them, a 4-byte timecode (TC) is added to standard 188-byte packets. The result is a 192-byte packet. This is what is informally called M2TS stream. Sony calls it "BDAV MPEG-2 transport stream". JVC calls it TOD (possibly an abbreviation for "Transport stream on media") when used in HDD-based camcorders like GZ-HD7.[9] M2TS transport stream is also used for AVCHD video files, which often have MTS extension.