Like most professionals who give some thought to their online profile, I’ve spent some time on Quora in my fields of interest. I’m not a ninja at it, like Suster and increasingly Ehrenberg, but a man’s got to sleep sometime.
2010年12月30日星期四
2010年12月29日星期三
Skype Postmortem: Overloaded Servers and Desktop Bugs Brought Us Down
Skype today published a lengthy postmortem explanation concerning why its service went down for the better part of two days last week.
CIO Lars Rabbe says in a blog post that a set of support servers responsible for Skype instant messaging became overloaded, and as a result sent delayed responses. A bug in the latest Windows version of the Skype desktop software failed to process these delayed responses, causing them to crash. About half of the world’s Skype users who were signed on at the time the problem began were using that version of the software, and of those, about 40 percent crashed. Among them were users whose machines were serving as supernodes. Rabbe says as many as 30 percent of the Skype network’s supernodes were among the crashed machines.
Losing those supernodes increased the load on other still-functioning supernodes, which was compounded by all the crashed Windows users trying to restart their software and get back on the network. He says traffic to these supernodes surged to 100 times normal volume for that time of day.
What he doesn’t go into great detail about was why the instant messaging servers became overloaded in the first place. Was this another bug in the server software? It’s a little unclear from this explanation.
Rabbe says Skype is trying to learn from the incident and has instituted new procedures to try to prevent this sort of thing from happening again. But this can’t help but hurt its reputation as it looks for ways to diversify its base beyond the millions of free users it has and make some actual money.
The whole reason Skype is supposed to work as well as it usually does is the strength and resilience of the network, and the fact that the network gets stronger as more people are signed on to it. To say that two bugs in a strange confluence of events could bring that entire network down raises a lot of fundamental questions about Skype.
Rabbe says an investment program to increase capacity to support paid consumers and enterprise customers is underway and will continue into 2011. I’m betting Skype will speed it up.
Mark Hurd Really Wants to Keep the Jodie Fisher Letter Private
Lawyers for former Hewlett-Packard CEO and now Oracle Co-President Mark Hurd today asked a judge in Delaware to allow him to intervene in a shareholder lawsuit against HP.
Plaintiffs in the lawsuit are seeking records related to Hurd’s departure from HP in August, including a letter that accused him of sexually harassing Jodie Fisher, a sometimes-actress who worked as a contractor for HP. The U.S. Securities and Exchange Commission is also looking into the possibility that Hurd told Fisher about HP’s then-confidential plans to acquire IT services firm EDS.
Hurd has been trying to keep the letter from being made public, and argued to the judge that since it is his personal property, he should be allowed to join the lawsuit as a party to that end. In the motion, Hurd’s lawyers argue that the letter was sent to “achieve private resolution of a potential dispute” between Hurd and Fisher.
2010年12月27日星期一
How to Transfer iPod Music to Mac
It also works well on iPod 1G, iPod 2G, iPod 3G, iPod 4G, iPod Classic, iPod mini, iPod nano 1, iPod nano 2, iPod nano 3, iPod nano 4, iPod shuffle 1, iPod shuffle 2, iPod shuffle 3, iPod Touch, iPod Touch 2, iPod Video, iPhone, iPhone OS 3.0/3.1/4.0. Still have any questions regarding Aiseesoft iPod Manager for Mac? Explore How to transfer iPod music to Mac at once.
2010年12月25日星期六
Downgrade PSP to version1.5 using PSP battery
Lots of users downgrade their PSP to version 1.5 because they can upgrade their PSP to any version from 1.5. And if you upgrade your PSP to version 3.51, you can play any downloaded games and run any applications. Do you know that you can downgrade your PSP system to version 1.5 all by yourself by turning your PSP battery into a pandora's battery? All you need are an original PSP battery (with more than 50% charge) and a Memory Stick Pro Duo with 1GB memory or above.
I. Get ready (Reformat PSP memory stick)
Before you get started with the downgrade, you need to reformat your PSP memory stick. If you don't know how to reformat it, you can refer to the steps below:
1. Press the HOME button on the bottom left of your PSP.
2. Use the arrow keys to move to the Settings area, then move the up and down keys to go to System Settings.
3. Push the "X" button (or the "O" button, depending on which button is the "Enter" button of your PSP) and scroll to find the "Format Memory Stick" option. Push the "X" button again to select this option.
4. Your PSP will now confirm that you want to reformat the memory stick, choose yes and your PSP will be physically formatted in a few seconds.
To do the downgrade, you also need to download an application pack. After the downloading is finished, what you get will be a compressed application pack named "pandora", decompress it to the root directory of a hard disc, say Disc H. In this "pandora" folder, you can see four folders including mspformat, msinst, battery and installer, and a file named UPDATE.PBP.
Now you are ALL ready to turn your PSP battery to a Pandora's battery and use it to downgrade any PSP!
II.Turn your PSP battery into a padora's battery
Step 1: Logically reformat your PSP Connect your PSP to your computer. And your PSP will be recognized as a new hard disc, say K. Then click Start -> Run, input cmd in the popped up dialog box, and click OK to enter DOS system. Use the below commands one by one to run the mspformat file: Input "H:", and press the "Enter" Key on your keyboard. (Here H is the disc where the "panndora" folder is located) Input "cd pandora" and press the "Enter" Key on your keyboard. Input "cd mspformat" and press the "Enter" Key on your keyboard. Then input "mspformat.exe K" and press the "Enter" Key on your keyboard. (Here K is the name of the disc that your PSP is recognized on your computer.) After these commands, your PSP will be logically reformatted in a minute.
Step 2: Open the recognized PSP hard disc on your computer, create a new folder and name it "PSP", open this "PSP" folder, create a new folder and name it "game". Copy and paste the "installer" folder and the "battery" folder into the "game" folder. Then copy and paste the UPDATE.PBP file to the root directory of the PSP hard disc on your computer.
Step 3: On your PSP, switch to the Game option, press X or O (depending on which is the "Enter" key of your PSP). Go to "installer" and press X or O to run it.
In a few seconds, a file named "msipl.bin" will be created on the root directory of your PSP memory disc. And now, you should take out your memory disc and then put it back in, which seems to be useless but is a very necessary step.
Step 4: Connect to your PSP back to your computer. Then enter DOS system as mentioned in Step 1. Use the below commands one by one to run the mspformat file:
Input "H:", and press the "Enter" Key on your keyboard
Input "cd pandora" and press the "Enter" Key on your keyboard.
Input "cd minst" and press the "Enter" Key on your keyboard.
Then input "msinst.exe K K:\msipl.bin " and press the "Enter" Key on your keyboard. (Here K is the name of the disc that your PSP is recognized on your computer.)
When you see a popped up message asking if you are sure, click "Yes".
Step 5: Go back to your PSP, switch to the Game option, press X or O (depending on which is the "Enter" key of your PSP). Go to "battery" and press X or O to run it, press X or O to OK every popped up message to finish running the battery application.
Now, your pandora's battery has been created!
III. Use the created pandora's battery to downgrade your PSP
After you turn your batter to a PSP downgrade battery (pandora's battery), you can use it to downgrade your PSP by following the instructions below:
Take out your PSP Memory Stick and battery, then put back in your PSP Memory Stick first, and put your battery back in.Turn your PSP power on, when you see three options; select the Downgrade option, your PSP will be downgraded in a very short time and it will be automatically shut down afterwards.Turn your PSP on again, and you will see a blue screen. But no worries, you can just press the O key, and your PSP system is already version 1.5!
Note: The above process will turn your PSP battery to a pandora's battery that can be used for PSP downgrade. But the pandora's battery cannot be used to play PSP games, videos or music. And the process is not reversible. You will need to get an additional PSP battery for regular uses. However, you can use your pandora's battery to downgrade any PSP to version 1.5 or even repair you PSP.
Recommended Products For you:
DVD to PSP Converter for Windows
Aiseesoft DVD to PSP Converter for Windows is a professional application that is designed to convert DVD movie to PSP on PC.
PSP Movie Converter for Windows
Aiseesoft PSP Movie Converter is a professional video to PSP converter for Windows that can convert all sorts of video formats to PSP video on PC.
2010年12月24日星期五
How to compress DVD-9 to DVD-5 for Mac
We often use DVD to store video and data file. Varieties of DVDs are sorted by the way data stored.
DVD-9 holds 8.5GB and is supported by the DVD+R and DVD-R formats. It is also known as Single-Sided Double Layer (sometimes called Dual Layer). The official names are DVD-R DL and DVD+R DL.
DVD-5 holds 4.7GB and is supported by the DVD+R/RW and DVD-R/RW formats. It is also known as Single-Sided Single Layer.
If you want to compress Double Layer DVD-9 to Single Layer DVD-5 on Mac, you must use one Mac DVD Copy software. Download this Mac DVD Copy to have a try;
Buy NowFree trial(Intel PPC)How to compress DVD-9 to DVD-5 for Mac
 Insert your DVD and select the copy DVD mode
 Select souce: Choose DVD-video disc from the source pop up menu.
 Select target: From the “Target” pop up menu, select the DVD disc, and on the type of DVD disc, please select the disc type “D5(4.7GB)”(there are three types of DVD discs: D5(4.7GB) Disc, D9(8.5GB) Disc and customized disc.)
 Start to compress DVD:Click “Start Copy” button to begin your DVD compressing.
learn more on: how to edit DVD file with DVD Copy for Mac.
2010年12月22日星期三
Some problems the new iPod touch users may meet
1. How to change iTunes to recognize the new iPod touch
Some New iPod users may meet the situation that your iTunes can not detect your new iPod nano, iPod touch, or iPod Classic. It should recognize it immediately. If it doesn't, download the latest version of iTunes. The problem will be solved:
1) Re-launch iTunes, with and without your iPod plugged in.
2) With iTunes open, reset your iPod Touch
(here:http://docs.info.apple.com/article.html?artnum=305743 ) Press and hold the Sleep/Wake button and the Home button at the same time for at least ten seconds until the Apple logo appears.
3) Restart your computer leaving your iPod touch plugged in
Note: If you uninstall iTunes from a computer, it will be uninstalled for all the users. But it will show up again for all users once you re-install it again. Before uninstalling each user should backup his/her playlists so they can bring them back when the re-install is completed.No music for any of the users will be removed by iTunes. It will remain intact where it is saved.
2.'I can't turn on my iPod'
I have a 1st or 2nd generation video iPod (80 gig).
My computer is windows 2000 so I downloaded the windows 2000 iTunes. So I decided to update my iPod, it was updated and it was fine. It ran out of power. Then it won't turn on? I tried to charge it but it just keeps saying please wait such and such. I left it there for like 2 hours already, and still it didn't charge up... Is the problem because I updated my iPod or something else? And when I opened my computer, iTunes asked me if I can format my iPod into windows. I put yes, it didnt do anything.So I have to problems, its not charging.. and its not turning on.
by Ashley :'My friend had this same problem a few years ago.She just left it plugged in to her computer for a few days, waited it out... eventually the problem fixed itself on its own. I'd say just wait it out for a day or two, and if it's still having problems, take it in to your nearest Circuit City or something.”
by Karat :'its the most popular iPod problem. If you drain the battery fully, you're screwed. Basically the battery is down, but the darn thing wont charge unless you connect it to the usb and the usb wont detect it unless it has charge! So please take it to your nearest apple outlet.”
by Kylla :'The one thing you never want to do with an iPod is let it run out of power, not good for it at all :P I've done it a few times but try to avoid it. What you want to do is hold the menu button and the play/pause button at the SAME time and just wait for it. It should restart it. Thats how my iPod works, yours could be different so experiment with the buttons. Try holding perhaps the center button and the play/pause button? or center button and the menu button? Try to see which two buttons will restart it, its bound to work. But hold BOTH of them down at the SAME time with one hand..and be patient, wait for about 10-15 seconds or so. :)”
3. Why does my 30G iPod video always die quickly?
Even when I am just listening to music. It shuts off after about 45 min. And that is a problem because I am going on a plane trip soon and I plan to watch a movie on my iPod, but movies eat your batttery. Does this happen to anyone else???? How can I make the battery life last longer. btw, it is only like a year old.
by dipin :'In an iPod the battery life is different.
it doesnt depend on how old it is rather it depends on how many times you have charged and discharged it.
for increasing the battery life you should fully charge the battery every time you are charging it . and secondly you should never let it discharge completely . put it on charging just before it shows the red signal and disconnect it only when it is fully charged.
sorry to say but now u'll have to get the battery replaced from apple reseller if you want to watch complete movie the battery life as said by apple is 500 complete cycles of charging and discharging”
by sugadoll :'The same thing happened to me. The problem is that your computer can't detect a completly dead iPod, but you need the computer to charge it so your screwed. j/k I solved it by pluging it into my ihome dock that plugs into the wall. So if you have a wall iPod dock or a car one you can charge it enough so that the computer can detect it. Problem solved.
Recommended Products For you:
DVD Ripper for Mac
Convert DVD to any video or audio formats on Mac OS X. Aiseesoft DVD Ripper for Mac is a professional Mac DVD ripper software.
Video Converter for Mac
Convert all video formats from one to another on Mac OS X. Aiseesoft Video Converter for Mac is a specially designed Mac video converter.
2010年12月21日星期二
Blockbuster Hangs “For Rent” Signs on 187 Stores
Blockbuster plans to close 182 stores over the next few months as it tries to emerge from bankruptcy, reports Bloomberg. The once-dominant movie rental chain faces competition from Netflix and, increasingly, from alternative video-on-demand providers. The store closures are in addition to the 1,000 locations shut down during the past two years. Next year, the company expects to emerge from bankruptcy with the help of new owners, including shareholder activist Carl Icahn.
2010年12月20日星期一
Tech Revival Lifts Silicon Valley
The revival of Silicon Valley is on display at the juncture of San Jose’s North First Street and Highway 237, which for years was largely undeveloped. But this year, networking-technology firm Brocade Communications Systems Inc. moved into a new 525,000-square-foot corporate campus in the area as it hired 600 new employees, boosting its headcount to about 5,000. Retailer Target Corp. has opened a store a few doors down, and a hotel is set to open nearby next year.
“We grew in a tough time and added people in a really challenging environment,” said Mike Klayko, Chief Executive of Brocade, which increased revenue seven percent to $2.1 billion in its fiscal year ended in late October. He added that Brocade currently has another 325 open jobs in Silicon Valley. “We’re interviewing all the time,” he said.
2010年12月18日星期六
Mad Dash: Amazon Extends Holiday Shipping, Falls Short of Wal-Mart
Amazon.com added a two-day extension to its free holiday shipping window today. For all of you procrastinators, you have until 11:59 pm PST on Dec. 19 to receive free shipping and guaranteed delivery by Dec. 24. That still doesn’t top Wal-Mart’s offer. It’s offering free shipping until 11:30 pm PST on Dec. 20, or nearly 24 hours longer. Wal-Mart estimates it will save customers $25 million in shipping fees this season.
2010年12月16日星期四
How to backup DVD movies to DVD for free
This is a tutorial that explains the process of backing up a DVD on a PC using DVD Shrink. While there are many software solutions for backing up DVDs, the one on Windows I like is DVD Shrink. On Mac OS X, I like this DVD Copy for Mac.
that can copy DVD movie (D9 to D9, D5 to D5) with the entire movie in 1:1 ratio perfectly. This tutorial will be a concise explanation of how to backup DVD movie to DVD for free. There are many reasons to make a backup copy of DVDs one has purchased, keep reading to learn how to improve the quality of your re-encoded backups.
Step 1, download DVD Shrink
You can download DVD Shrink from: http://www.DVDshrink.org/.
For Mac users, you can download the DVD copy for Mac from here.
Step 2, Run DVD Shrink and insert your DVD movie into the DVD drive
The first thing you will need to do is open the disc. Click on "Open Disk" at the top-left of the program window. A small window will pop up. There is a drop down menu - select the drive and disk that you are going to backup. Then click OK. When you click OK, the DVD will be “analyzed”–this process will last for 1-3 minutes, then DVD Shrink will “suggest” a level of compression.
If you receive an error while trying to rip the DVD (like the one shown in the screenshot above), you will need to use another program such as DVD Decrypter to copy the DVD files off of the disc on to your hard drive. You need to minus the copy protections first. Click here to read how to use DVD decypher to minus the copy protections of DVD.
Step 3. Adjust compression for individual Titles (optional).
DVD Shrink will automatically select the highest possible quality settings that will fit on your disc. You could accept the settings that DVD Shrink chooses. You can also increase the quality of the main movie file by reducing or eliminating other video and audio files on the DVD.
Many modern DVDs will contain bonus footage, trailers, multiple surround sound modes, and other settings that one can reduce or eliminate to improve the quality of the main movie feature.
The main movie quality setting is reported to the left of a slider bar in the top right of the screen. In the screenshot below we see that the default setting requires that the main movie be compressed to 48.2% of its original level to fit on the disc. You can increase this percentage to improve the final quality of the backed-up DVD. But the output file will be larger.
The way in which one goes about improving the quality of the main movie will be different depending on your specific needs. For example, when “Dolby Digital” and “DTS” 5.1 audio tracks are available, you can remove “DTS” (to save hundreds of megabytes), you can also choose to preserve “DTS” and reduce or eliminate other items from the DVD.
Some of the settings I made to this particular DVD were:
--Removed “5.1-ch French” audio track (went from 48.2% to 55.4% compression for main movie).
--Replaced certain Titles with “Still Image” (keep reading for more on this).
To improve the quality of the main movie, you'll need to reduce or eliminate other DVD features, each called a “Title” in DVD Shrink. Click the “plus sign” next to “Extras” in the menu to view the other titles.
The Title I've selected below was 72MB. In this case the video was a “behind the scenes” feature that I did not wish to keep. Since one cannot completely remove any of the “Titles,” the next best thing is to replace them with a still image. In order to do this, select the title you want to replace, and choose “Still Image” from the drop-down menu in the top right. In this case the file went from 72MB to 66MB. The still image is configurable, simply drop an image of your own into the aptly named Still Images directory found under Program Files > DVD Shrink.
Step 4, Burn the re-encoded files to disc.
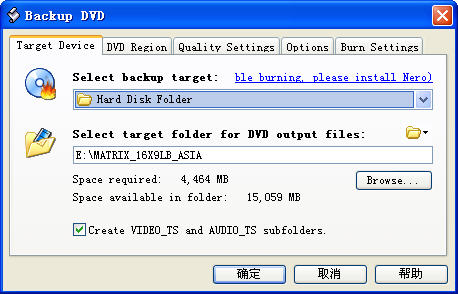
Click “Backup DVD” and Now select the folder where your temporary files will be saved. DVD Shrink needs to save a bunch of files on your computer (that actually compose your movie) so that it can burn that movie back onto another DVD. This is why you had to clear 5 gigs of space on your hard drive. Once the DVD backup has been burned, you can go ahead and delete these temporary files (the program does not do this itself).
You may as well select “Region Free” (default) under the DVD Region tab.
on the Burn Settings tab make sure “Maximum” burn speed is selected in the drop-down menu.
Once you have the settings the way you like them, begin the burn process. You'll see the “Encoding” happening first. There is a video preview that will show you where you are, but I believe that the encoding process goes slower with this setting enabled.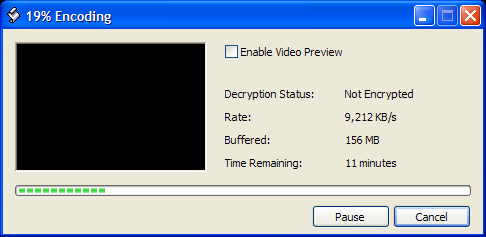
Once the files have been copied to your hard drive, your original DVD movie will eject from your computer.
You will also have a pop up asking you to put a blank DVD into the DVD burning drive of your computer that you previously selected.
Exchange the original DVD movie for a blank, burnable DVD. Push the blank DVD into the drive. DVD Shrink will begin burning the new DVD automatically in a few seconds. Now you will get a pop up that shows the progress while the program burns your new DVD movie. Once the new DVD has been burned, you will get a window that tells you that it's done. Click OK, close the program, and take your new DVD movie backup. All Done!
Note: DVD Shrink is only for PC users. If you are a Mac user, Please download DVD copy for Mac .
2010年12月15日星期三
2010年12月13日星期一
How to connect your Mac and Xbox 360
If, like me, you have your Xbox 360 placed near your wifi-enabled computer, but away from your wireless router or modem, then you'll want to take advantage of the Xbox's ability to "borrow" your computer's internet connection. For Windows users, this process is simple; it's just a matter of "bridging" your computer's wifi connection to your PC's internet port which is plugged into your Xbox. For Mac users, the process is not so easy. What follows is a guide for getting your Xbox 360 to accept Mac OS X's internet sharing option.
Before you start configuring, open up Terminal (in Applications -> Utilities) and type "ifconfig en0" (zero, not a capital-o). You're looking for the bit that says "inet xxx.xxx.xxx.xxx". In my case, the number I get here is 192.168.2.1 Second, note down the IP address of your wireless router, which in my case is 192.168.0.1
On your Mac
1. Connect your Mac to your wireless internet connection
2. Connect your Xbox 360 to your Mac via Ethernet
3. In System Preferences -> Sharing, enable Internet Sharing between your Airport and Ethernet connection
On your Xbox 360
1. Start up your Xbox and navigate to the Network settings menu
2. Under IP address, enter the number you got from the "ifconfig en0" command earlier on, but with the final number one place higher. In my case, I take the 192.168.2.1, and input 192.168.2.2 in the IP address box on my Xbox 360.
3. Under subnet, input 255.255.255.0
4. Under router/gateway, enter the number you got earlier from the "ifconfig en0" command. In my case, that's "192.168.2.1"
5. Move onto DNS. Enter the IP address of your wireless router (in my case, "192.168.0.1") in both the primary and secondary IP address fields
6. Leave PPPoE and advanced settings blank (i.e. OFF and Automatic)
7. You should now be able to connect to Xbox Live via your internet sharing Mac
This guide shows the connection of Mac and Xbox 360 is not so difficult. You can try it by yourself.
Zynga’s Titles Invading Android Platform Soon
Zynga will launch its popular Facebook game Mafia Wars for Android later this month, opening it up to the smartphone platform that is now activating 300,000 new customers a day.
It’s unclear if Mafia Wars or a Poker game, which was announced last month, will be the first Zynga title to hit the Android Market since both are roughly expected by the end of the year. So far, Zynga has launched mobile game titles only for the iPhone, including Mafia Wars, Poker and other popular virtual-world titles like FarmVille.
The company’s Android plans were revealed by David Ko, Zynga’s new head of mobile, who appeared at the LeWeb conference in France yesterday.
Earlier this month, Zynga acquired Newtoy, which will help it expand to more mobile platforms. At the time, Ko said FarmVille had been downloaded seven million times in five months, and in general, Zynga has more than 10 million people accessing Zynga games on a mobile phone. “Our goal is to have Zynga games available to anyone anywhere, on any device,” he said.
Does that include other platforms, like Windows Phone 7 or BlackBerry? “As we start to think across international territories, we’re going to have to think about some of the other platforms out there,” Ko reportedly said.
It’s unclear how Zynga will monetize its games on Android, which doesn’t support buying virtual goods from within the app as seamlessly as the iPhone.
For example, Rovio, the developer of the very popular Angry Birds, has had to come up with its own workaround. Today, it announced that it is launching a new mobile payment system called Bad Piggy Bank, which charges purchases to a customer’s monthly cellphone bill. The system will initially launch on Elisa, the largest network operator in Finland. Rovio has intentions of rolling out with more carriers worldwide, and will potentially make it available to other developers as a payment platform, CNET reports.
2010年12月12日星期日
New Facebook Profiles Susceptible to Pranks
One of the most significant changes in Facebook’s profile page redesign this week was to highlight images–both pictures of users and pictures of their friends. As part of that, users who upgraded to the new profile (more info here) now have a strip of their five most recently tagged photos running right under their basic information.
The crucial feature of Facebook photos is that, by default, friends can tag users in pictures without the users confirming that the pictures are actually of them. So with the new layout, friends can decide what pictures show at the top of a person’s profile. And for the more creative, they have five concatenated pictures in which to do so.
Facebook users are already having fun with this option, pranking each other to show inappropriate pictures and silly sequences of words. BuzzFeed ran an NSFW example of this earlier this week, with one of its users apparently pulling the suggested prank on the Facebook of a fellow named Trent Reznor.
Users worried about their profiles being hijacked for everyone to see can change their privacy settings. (For instance, a user can limit who is allowed to see other people’s photos she is tagged in.)


2010年12月9日星期四
How to convert videos such as MP4, WMV, MOV and AVI to DVD for Free
DVD Flick is a free DVD authoring program that allows you to take a video file saved on your computer and converts it into a DVD that can play back in a DVD player, your computer, or Home Cinema set. The software allows you to add audio tracks and subtitles to your DVD. Your original video files may be in any of the following container formats: AVI, MOV, MPG, WMV, ASF, FLV (Flash video), Matroska and MPG. Supported codecs include MPEG-1, MPEG-2, MPEG-4, XVid, DivX, WMA and WMV (Windows Media Audio and Video), MP3, OGG Vorbis, H264 and On2 VP5/6. The program is open source.
DVD Flick is the all-in-one tool that can convert:
AVI to DVD, FLV to DVD, HDMOV to DVD, MKV to DVD, MJPG to DVD, MPG to DVD, M2V to DVD, MP4 to DVD, M4V to DVD, NSV to DVD, NUT to DVD, QT to DVD, MOV to DVD, RM to DVD, SMK to DVD, OGM to DVD, WMV to DVD, ASF to DVD, 3GP to DVD, 3G2 to DVD for free.
DVD Flick supports DVD Authoring, ISO image creating, DVD burning also in one tool.
System requirements:
- A Pentium or AMD K-6 processor. Pentium 3 or later recommended, the faster the better.
- 64 MB of free physical RAM, 128 MB or more is recommended.
- Windows 2000, Windows XP , Windows Vista (If you are Mac user, use this Mac dvd creator)
Download the latest version of the DVD Flick website
If you are using Mac, Please click here to download the Mac DVD Creator
1. Download and run DVD Flick
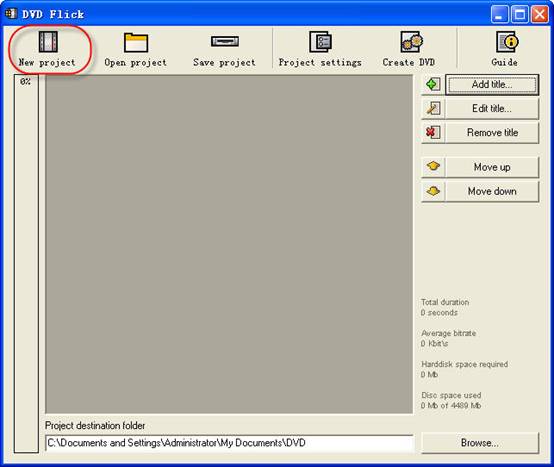
2. Click "New project” button to create a new project.
3. Browse your hard drives to select path to the folder, where the resulting DVD folders
(AUDIO_TS, VIDEO_TS) will be saved. It is highly recommended to use NTFS file system in your OS, cause the temporary m2v files in most cases exceeds 4GB limit for FAT32 file system. Additionally, don't use non-English letters to the browsing path, because the errors could occur during DVD authoring process.
4. Add your title - select the video file or files for the project. DVD Flick supports these video file types: AVI, FLV, HDMOV, MKV, MJPG, MPG, M2V, MP4, M4V, NSV, NUT, QT, MOV, RM, SMK, OGM, WMV, ASF, 3GP, 3G2.
5. Title added. Left bar indicates how many bytes is used on the blank DVD disc with the default preferences. The percentage depends on the video file size which you have added in the previous guide step.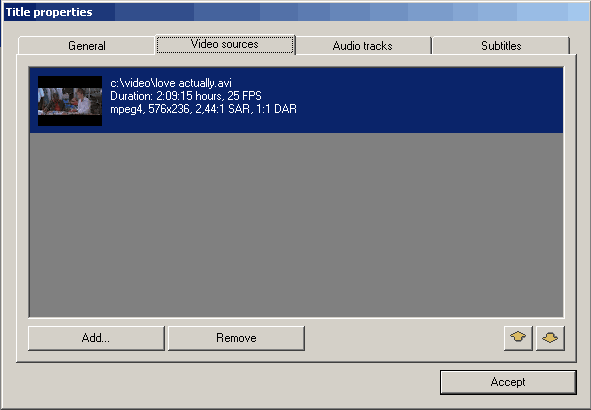
6. Edit title.
(1) General settings for the "Title".
reate chapters every: Purpose of the chapters usage is forward/back skipping forward during the DVD viewing. It is recommended to use this option.
You can also use fixed numbers of chapters - check "Create" button.
Aspect ratio is an auto detected value received from video file's frame dimension.
(2) Video sources for the "Title" - this tab informs us about video codec, frame size, Aspect ratio value, frame rate - Frames Per Second.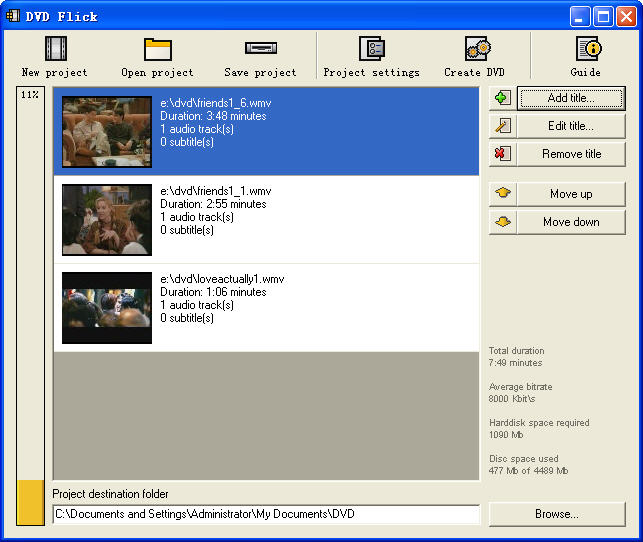
Frame rate. Check the bottom listing:
- 23,976 FPS - NTSC Film Format
- 25 FPS - PAL Format
- 29,97 FPS - NTSC Format
- 30 FPS - NTSC Format Reccomendations for the non-standard
- 12,5 FPS - PAL Format
- 15 FPS - NTSC Format Warning! Remember the format for your file - it will be the same "Target format" in "Project settings" .
Add a file to a title: This option allow to you to add new file or files to the "Title". It could be additional videos for this DVD, cutted scenes for examples, etc. Important thing is the same FPS for the main video file and the additional file.
Remove a file to a title: You can also remove a file to a title.
(3) Audio tracks tab.
Remove an audio track: Press "Edit" button, then remove from the "Audio track sources" additional audio track.
Add an audio track: Press "Add" button on the ”Audio track sources" tab, select the audio file from hard drive, check in the new "select audio track(s)" window track(s) you wish to add. Press "Accept" button. DVD Flick could extract audio tracks from all supported video files (AVI, FLV, HDMOV, MKV, MJPG, MPG, M2V, MP4, M4V, NSV, NUT, QT, MOV, RM, SMK, OGM, WMV, ASF, 3GP, 3G2), and also native audio file formats: AAC, AC3, Flac, MKA, MP3, MP2, MPA, OGG, WAV, WMA
Select language for the additional audio track. Select the audio track, and then select from the”Track language" list box.
(4). Subtitles tab.
Add subtitles. Press "Add" button on the "Subtitles" tab, and then select from disk file with subtitles. DVD Flick supports these subtitles formats: AQT, JS, RT, SMI, ASS, SRT, SSA, TXT. Subtitle settings. Press "Edit" button to change subtitles settings. Select the language you need. Other settings are for the Font, Font size, and placement of the subtitles. As usually, press "Accept" button to save setting. "Force display" option will force subtitle displaying during playback, even they were not selected in menu.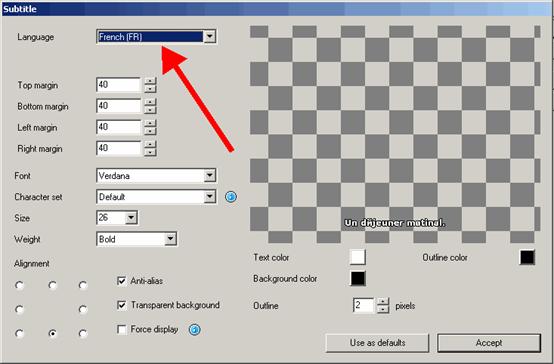
If everything was made rightly, we will see this window with the changed settings for subtitles. There are no more editing tabs for "Title properties". Press "Accept" button to save preferences.
7. Project settings. At the DVD Flick main window press "Project settings" button.
General tab.
Select a "Target size" for your DVD from list box. The default value is "DVD (4,3 GB)", default values could be changed by pressing "Use as defaults" button. If you need to select custom DVD size just scroll up the list box to the "Custom" value and the bottom "Custom size" option will be enabled for editing.
"Encoder priority" allows to you to use "DVD Flick" with high priority in your operating system to decrease full encoding time.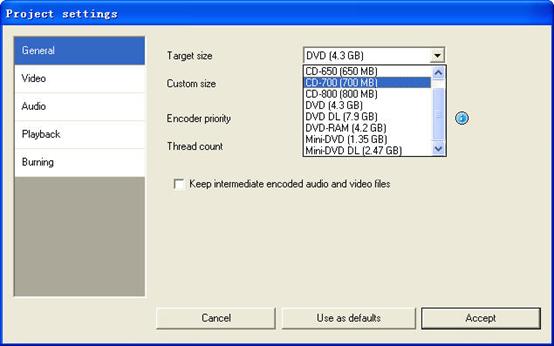
Video tab.
Set your DVD "Target Format".
"Encoding profile" for better encoding performance is highly recommended to select as "Normal" or "Best". "Fastest" and "Fast" mode decrease full encoding time, but with the lower quality results.
"Target bitrate" is more easy to use as "Auto fit". This option will calculate bitrate for encoding automatically depends on DVD "Target size" and will be set as maximum possible value. If you have some advanced experience with DVD encoding, you can set "Custom bitrate".
Set up advanced video options - press "Advanced" button.
Check "Second encoding pass" to improve output encoding results. It is highly recommended to use this option, but it wills increase full encoding time.
Check "Half horizontal resolution" to enable Half D1 DVD Mode - one of the standard for DVD, decreases frame size to 352x576 for PAL and to 352x480 for NTSC (instead of 720x576 (PAL) and 720x480 (NTSC)). Could be used as a possibility to decrease encoding bitrate, for more video length on one DVD disc.
Check "Add overscan borders" to make your DVD with black left and right borders to view all the source video on your TV.
Deinterlace option is not recommended to use.
Check "Force MPEG-2 recompression" to recompress your mpeg-2 video source files, do not check option if m2v files were encoded with Cam Video Tool 4 DVD Flick.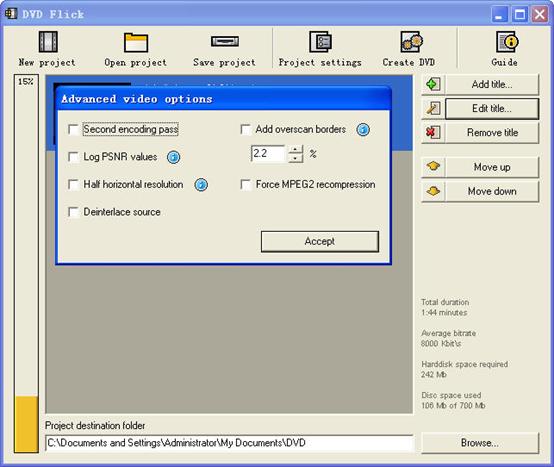
Burning tab.
If the "Create ISO image" is set, the ISO image file will be created on your disk, in the "Project destination folder". ISO image could be useful, if you prefer to burn DVD using another application, supporting ISO images. "MDS" (Media decriptor) file will be created also. If you want to burn your DVD with DVD Flick, check "Burn project to disc" (red arrow). if you are using DVD+RW, DVD-RW disc, check "Automatically erase disc if it is rewritable". If quick erase will be not possible, ImgBurn (included in DVD Flick installation package) will make full erase for rewritable discs.
Accept all "Project settings" using "Accept" button. Now we are ready to burn our DVD.
8. Create DVD.
Press "Create DVD" button at the main window.
DVD Flick will ask for confirmation to proceed - press "Yes".
Additional warning about "Project destination folder" - Press "Yes".
"DVD Flick Progress" window shows to user all executed steps.
When the DVD burning will be done, we will see this window. Press "Close" to return to the DVD Flick main window. In the main window you can save DVD Flick project to your hard drive.
DVD Flick is only for Windows PC users. If you are Mac user, you can use this best DVD creator for Mac. It is a professional Mac DVD Burner program that converts almost all popular video formats such as FLV, MPEG1, MPEG2, MP4, DAT, 3GP, 3G2, MOV, AVI to DVD on Mac. And it can burn DVD movie playable on portable or home DVD player on Mac.
If you want to convert iTunes videos to DVD, you need to get the videos from iTunes to computer .
And then use DVD flick to convert iTunes videos to DVD for free.
If you want to burn YouTube videos on DVD, you can download the youtube videos to your computer.
And then using DVD flick to burn YouTube videos on DVD for free. If you are a Mac user, use this best dvd creator for Mac to help you. You can also copy videos form other video sites such as veoh, google video, iFlim, vidilife, blip.tv, music.com, zippyvideos, dailymotion, devilducky, etc and then burn them to DVD using this methods.
Here are some other DVD burner.
DVD Styler
DVD Styler is an open source DVD authoring system for Windows and Linux. It converts MPEG files, which you can drag and drop into its window, create NTSC/PAL DVD menus which are highly customizable (you can set image backgrounds, put text and images anywhere, change the font and colors, etc), set chapters for the movie, etc.
DivXtoDVD Perl Script
DivXtoDVD is a Perl script for Linux and other Posix systems (like BSD, Unix, Unix-like operating systems) that converts a DivX movie to DVD compliant files (AUDIO_TS and VIDEO_TS directories and files). It uses transcode, ffmpeg, mjpeg and dvdauthor to do the job in one step. The software is open source. Note that this is different from the commercial ConvertXtoDVD software which was also formerly named DivXtoDVD. If you're looking for the latter, a trial download is available.
ImgBurn
ImgBurn is a lightweight CD / DVD / HD DVD / Blu-ray burning application that everyone should have in their toolkit! It has several 'Modes', each one for performing a different task:
Read - Read a disc to an image file
Build - Create an image file from files on your computer or network - or you can write the files directly to a disc
Write - Write an image file to a disc
Verify - Check a disc is 100% readable. Optionally, you can also have ImgBurn compare it against a given image file to ensure the actual data is correct
Discovery - Put your drive / media to the test! Used in combination with DVDInfoPro, you can check the quality of the burns your drive is producing
Q DVD-Author
Q DVD-Author is essentially a GUI front-end for dvdauthor and other related tools found on a Linux system. You can create DVD menus, convert your projects between PAL and NTSC (and vice versa), create sub-menus, add subtitles, transcode your input videos from other formats, apply multiple audio streams to the videos, give menus multiple soundtracks, create a DVD slideshow, create animated menus, etc. This is an open source program that works under Linux and other Posix OSes.
KDE DVD Authoring Wizard
The KDE DVD Authoring Wizard allows you to create a DVD from a DVD-compatible MPEG-2 file (that is, it doesn't do the conversion from other formats for you). You can add multiple files and create a menu of the playlist if you wish. Your DVD menu can have multiple pages, a soundtrack from OGG or MP3, animated thumbnails and be in the NTSC or PAL format, be in 16:9 widescreen or 4:3 full screen, etc. This DVD authoring tool works under Linux. It is open source.
2010年12月8日星期三
The iPod Family(Part 1)
We're hard pressed to say the iPod family's fallen on particularly hard times, but being under such excruciating public scrutiny can take its toll on any dynasty; especially in a year like 2005, the family shaken to its core by so many tragic deaths. From the humble beginnings of the iPod that began the legacy so many years back, all the way up to the tragic loss of the iPod mini just yesterday, we felt it might be time to take a visit to the iPod family cemetary on this early autumn afternoon.
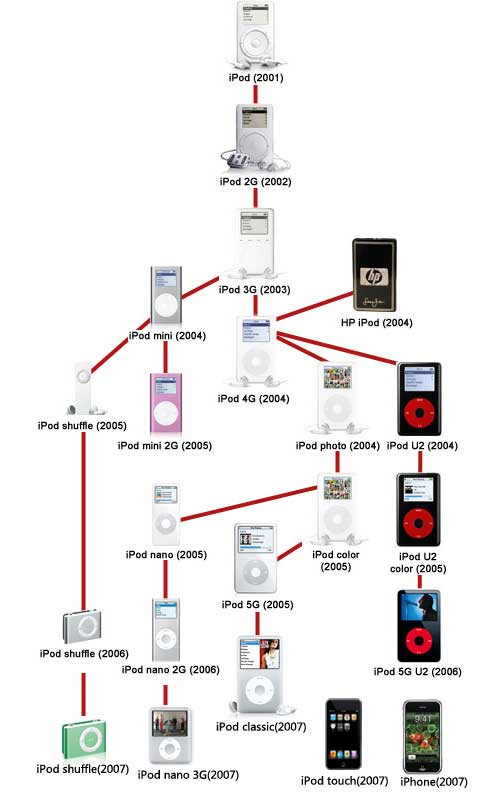
iPod family Tree
2001
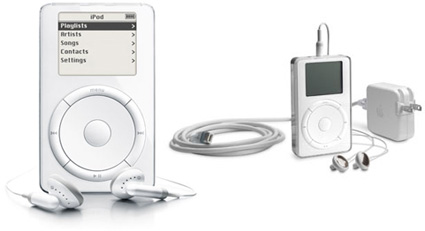
The first generation iPod-October 2001 - July 2002
2002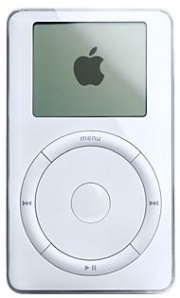
The second generation iPod-July 2002 - April 2003
But a few mournful months after the passing of the 5GB iPod and the birth of the 10GB iPod, came a new 10GB iPod and the 20GB, which started at $499. Perhaps one of the least well-remembered of the iPod family, this iPod included the first non-mechanical (solid state) scroll wheel, though the center and circumference buttons remained tactile. Perhaps most groundbreaking was the official Windows support (via Musicmatch Jukebox, ironically), though the wired remote, calendar, and artist search were all significant as well. Eventually this iPod would undergo tattoos by Beck, No Doubt, Madonna, and Tony Hawk before being committed to history in April of 2003.
2003

The third generation iPod-April 2003 - July 2004
This was the iPod—born of humbler pedigree—that grew up, provided for itself a higher education, and made its own way in the world. The third generation of the family rid itself entirely of mechanical buttons on its body, shed some of its baby fat around the waist down to 4.1 x 2.4 x 0.62-inches, and came forth at $299 for 10GB, $399 for 15GB, and $499 for 30GB. This was also the first iPod child to feature a remote connector and dock connector—which finally enabled USB 2.0. In September the 30GB iPod was priced at $399, and a 40GB model was released for $499.
Related theme:
The iPod family(part 2)
The iPod family(part 3)
The iPod family(part 4)
The iPod family(part 5)
Recommended Products For you:
DVD to iPod Converter for Mac
It's a specially designed iPod conversion program to Convert DVD to iPod touch, iPod classic, iPod nano, convert DVD to iTunes on Leopard.
iPod Video Converter for Mac
It can convert MP4, MOV, 3GP, AVI, RM, MPEG, ASF and FLV to iPod video with high output quality and various features .
2010年12月7日星期二
Another eBook Store? Yep! But This One’s From Google.
Don’t want to buy your ebooks from Amazon, Apple, Barnes & Noble or Borders? Google is happy to help: The search giant has launched its own e-book store, along with its own ebook reader software.
Lots of today’s Google eBook launch has already been covered in the past (this Wall Street Journal piece from last week got a lot of it). And since I haven’t been able to actually take the store and software out for a run, I can’t vouch for any of it so far.
But here’s what you need to know at the start:
- Google is opening its own store, but the big goal is to set up an ecosystem and e-commerce channel that works across the Web.
- That means you can buy ebooks directly from Google, and you can also buy books from the sites of independent book shops, like Powell’s Books.
- That also means you can read the books on multiple platforms: There’s an Android app, of course. But there’s also an Apple-approved app in the iTunes store. And since the system is Web-based, you can read the books you buy on PCs and tablets, too. As well as e-readers from Sony, Barnes & Noble and Borders. The only place you can’t read Google-purchased titles–Amazon’s Kindle.
- Google says its catalog will be competitive with everyone else’s, though it’s hard to assess that without really digging in. It says it will have some three million books available in the store, “hundreds of thousands” of which which are commercial titles. Amazon, by comparison, boasts of 750,000 titles, but it’s including periodicals in that total.
- One distinct advantage Google has over a particular rival: Unlike Apple, it has access to Random House titles, which aren’t available on the iBooks platform due to a dispute about pricing.
- Speaking of pricing: Google says it supports both the traditional wholesale/retail model, as well as the new “agency” model that Apple has been pushing.
- Where’s all this going? Good question! Google executives argue that this is just a natural extension of its ongoing books project, which is supposed to make as many books available to as many people, period–it’s just that they happen to be selling some of them now. But view it from a different lens, and it looks like yet another attempt by Google to move from pointing to stuff, and selling ads along the way, to selling stuff, period. It hasn’t worked yet, but the company seems dead set on making a go of it.
2010年12月6日星期一
Qualcomm CEO Explains What Happened to Smartbooks
A year ago, Qualcomm CEO Paul Jacobs was talking a lot about smartbooks.
Today, well, not so much.
For those who have already forgotten what the smartbook even was, the idea was to have a low-cost device that looked a lot like a netbook, but offered far better battery life and instant-on capabilities.
But once Apple released the iPad, everyone started focusing on tablet devices rather than on little notebooks.
“Obviously, tablets are the flavor of the day,” Jacobs said in an interview on Tuesday, ahead of his panel discussion at the Churchill Club.

The good news for Qualcomm, Jacobs said, is that the tablet requirements are basically the same as those for a smartbook.
“We probably did ourselves a little bit of a disservice by using [the term] smartbooks because people then thought notebooks and therefore it was a clamshell form factor,” he said. “We always thought about them not in terms of form factor but in terms of what they did, meaning always on, instant on, always connected, always downloading–the tablet designs that are out are doing that.”
Jacobs said we will probably see some devices with a physical keyboard, but said that next year we’ll continue to see far more slates than clamshells. The same, he notes, is also holding true for the phone.
“Keyboards on smartphones have become less and less evident for most of them,” he said.
For its part, Qualcomm is working on making its processors faster and more power efficient. A dual-core chip, due in the first half of the year, will offer five times as much performance or provide the same oomph as the current chips while using only a quarter as much power.
Since Jacobs has a good view of all the various devices coming to the market, I asked him whether he thinks that a couple of years from now we will still see five or six competing smartphone operating systems.
“A couple years from now I think we will,” he said. “Five to 10 years from now, I think there will probably be some winners and some losers although it’s pretty hard to say who those are going to be because different companies bring different things to the table.”
The carriers will bring some pressure, he said, given they have to provide support and shelf space to all the different operating systems. However, he also said it’s likely that some alternate channels will emerge beyond just sales from the carriers.
“It’s hard to put a time frame on when more consolidation will happen,” he said. “I think right now we are in a period of expansion. You are going to see more stuff….Everybody is chasing [Google] Android and Apple right now, but I think there’s room for a lot of diversity, at least in the near term.”
2010年12月5日星期日
LimeWire Makes It Official: It’s All Over
It took a day, but LimeWire has responded to my request for comment on its imminent shutdown: It acknowledges that it’s shutting down, imminently. Via email: “Given our current situation, plans to bring our separate, legal music service to market have been canceled. The beginning of 2011 will mark the closing of LimeWire’s New York office and cessation of business by LimeWire. We attracted some of the top talent from the technology community over the years to build our new music service. We’ll be helping our team members commence their job search over the next few months.”
2010年12月3日星期五
How to Add Limewire Songs to iPod
Many people download music from Limewire, but they can only listen them on computer. Put songs from Limewire to iPod touch is really difficult to many iPod users. Yes, you need to convert Limewire songs to iPod audio format by iPod Music Converter; actually, it is iPod mp3 converter or audio to mp3 converter, because iPod accepts mp3 audio files.
This article will share you how to add Limewire songs to iPod.
Part 1: For Windows users, how to add Limewire songs to iPod.
Step 1: Download Aiseesoft iPod Movie Converter
You need to download an iPod Music converter: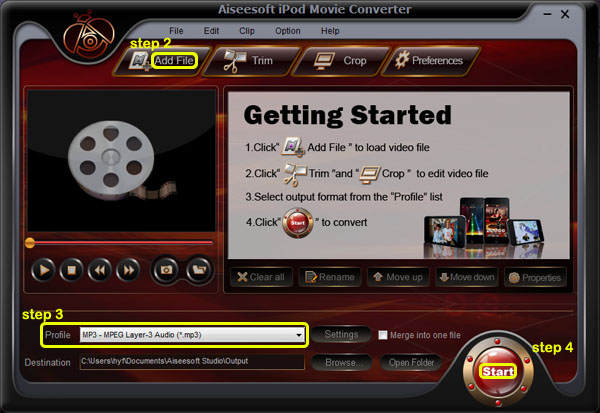
Step 2: Add Music
Click “Add File” and find your Limewire songs to load into iPod Music Converter
Step 3: Choose output format
You can choose output audio format from profile drop-down list—MP3
Step 4: Start to convert
Click “Start” button to begin your conversion.
Then you also need a tool to transfer your songs to your iPod.
Here I recommend you Aiseesoft iPod Transfer.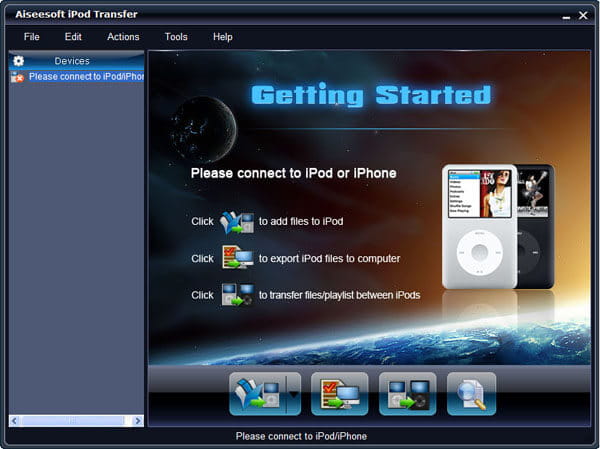
It is very easy to use:
Step 1: Connect iPod.
Plug your iPod to your computer via USB cable.
Step 2: Add songs
Click “PC to iPod” button to pick up the songs you have already converted and click “OK”. Now, you can enjoy your Limewire songs on your iPod at will.
Part 2: For Mac users, how to add Limewire songs to iPod
For Mac users, I recommend you Aiseesoft iPod Video Converter for Mac and Aiseesoft iPod Manager for Mac.
Step 1: Add file
Click “Add File” to load your music
Step 2: Choose output audio format
Click “profile” to choose your output audio format.
Step 3: Convert
Click “Start” button to begin your conversion.
To transfer converted songs to iPod, Mac users can use iPod Manager for Mac.
Step 1: Connect iPod
Plug your iPod to your computer
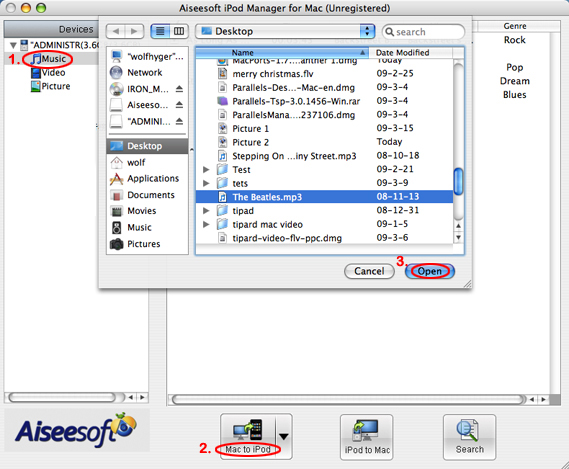
Step 2: Add music
1. Click “Music” (1)
2. Click “Mac to iPod” (2) and pick up the songs on your Mac you want to put on your iPod and click “Open” (3)
Few seconds later, the songs will be on your iPod.
2010年12月1日星期三
How to upload videos to YouTube easily and quickly on Mac
Google has released basic software called Vidnik which is the quickest, simplest way to make movies using the built - in camera on your Macintosh and upload those movies to your YouTube account. You must first sign up for a free YouTube membership to upload videos. You can use Vidnik to create a video diary, or just to quickly record a video comment to attach to an existing YouTube video. Vidnik works with the built-in video cameras on recent Macs, with Firewire video cameras, and with many USB video cameras.
Part 1, use Vidnik to Record video segments using your iSight camera and upload them to YouTube.
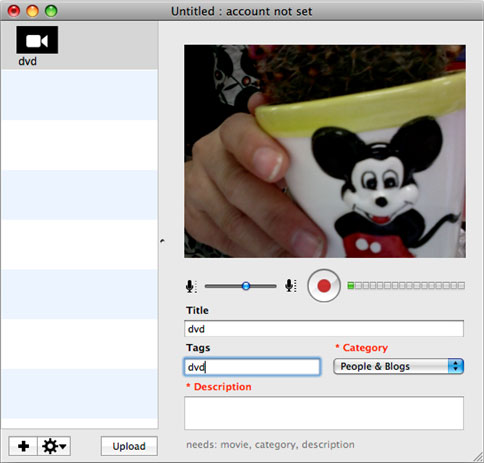
To use Vidnik, run the app, then click the record button to start recording. Click it again to stop. Trim to just the golden moments you want to keep, as in the screen shot above. Fill in the required title, description, and so on. Click the upload button. That's it.
Part 2, Use Vidnik to upload videos to youtube
You can drag movies made in other programs onto Vidnik's column of movies, and then click the upload button. And to use another program to do a little post-production, use the Gear menu to show Vidnik's movie file in the Finder. Edit the movie in the other program, and then upload it.Vidnik can only support videos such as: 3GP, AVI, DAT, MOV, MP4, M4A, WAV, AAC. It does not support ASF, FLV, MPEG, RM, WMV, MP3, AC3.
You can use the video converter for Mac to convert your videos to the formats that Vidnik can run.
If you want to upload DVD to TouTube, you need to use DVD ripper to rip DVD to video formats supported by YouTube first. If you are Mac user, you can use this DVD ripper for Mac .
Part 1, use Vidnik to Record video segments using your iSight camera and upload them to YouTube.
To use Vidnik, run the app, then click the record button to start recording. Click it again to stop. Trim to just the golden moments you want to keep, as in the screen shot above. Fill in the required title, description, and so on. Click the upload button. That's it.
Part 2, Use Vidnik to upload videos to youtube
You can drag movies made in other programs onto Vidnik's column of movies, and then click the upload button. And to use another program to do a little post-production, use the Gear menu to show Vidnik's movie file in the Finder. Edit the movie in the other program, and then upload it.Vidnik can only support videos such as: 3GP, AVI, DAT, MOV, MP4, M4A, WAV, AAC. It does not support ASF, FLV, MPEG, RM, WMV, MP3, AC3.
You can use the video converter for Mac to convert your videos to the formats that Vidnik can run.
If you want to upload DVD to TouTube, you need to use DVD ripper to rip DVD to video formats supported by YouTube first. If you are Mac user, you can use this DVD ripper for Mac .
2010年11月29日星期一
Download limewire free music and video to iPod, iPhone, PSP, Zune
This guide is mainly about how to use limewire to download free music and video to computer, and then transfer the limewire free music and video to iPod, PSP, Zune and iPhone. If you think it's useful, please digg it to let more people know it. This guide will include five parts as follow:
How to download free limewire video and music to computer?
How to put limewire free movie to iPod?
How to transfer limewire free movie to Zune?
How to add limewire free movie to PSP?
How to import limewire free movie to iPhone?
You can download limewire software free from its official site: http://www.limewire.com If you want to download youtube video to iPod, Zune, PSP, you can refer to this step by step guide: http://www.aiseesoft.com/article/free-download-youtube-video.html
Part1. How to download free limewire video and music to computer?
1. Download Limewire software, it’s totally free. http://www.limewire.com/download/version.php.
2. Install and run the Limewire, Just type in some words that you may be interested in, choose the type, and press search, then you can get a lot of files to download.
Find the just file and click download to get it. You can also download multiple files in one time. After you download the file, then right-click on the download files and choose “explore”, then you can locate your download files on your computer. You can also click Option, then you can set the default downloaded directory. Click tool folder for saving your file.
Part2. How to put limewire free movie to iPod?
Because iPod can play only MP4 and H.264 video. If your download limewire videos are not compatible with iPod, you can use Aiseesoft iPod Video Converter to convert them to MP4 video for iPod Touch/Nano/Classic. (Don't use iTunes to convert limewire video, because most limewire videos are muxed video, muxed video converted by iTunes will lost sound, you can learn more info about this problem by referring Apple official document: http://docs.info.apple.com/article.html?artnum=302588 )
Please follow these steps:
1. Download and install Aiseesoft iPod Movie Converter, you can Download the latest version for free from here: http://www.aiseesoft.com/ipod-movie-converter.html
2. Run Aiseesoft iPod Video Converter, click “Add” button to import your downloaded limewire videos, then click “Start” to start the conversion, the default setting works perfect.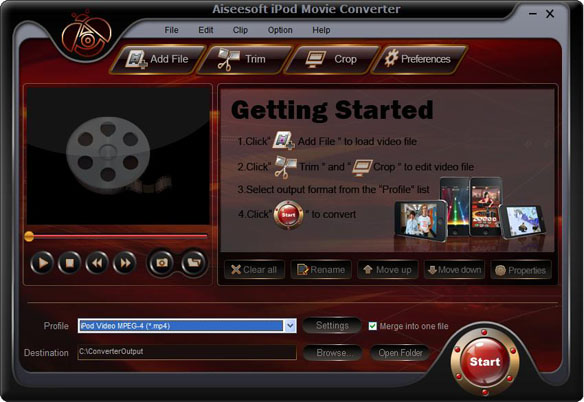
3. After conversion finished, You can use iTunes to transfer the mp4 video to your iPod, here are the steps:
1). Open iTunes and click "File" to add your converted videos to iTunes library.
2). plug in your iPod to computer, then iTunes will detect your iPod as a device.
3). Select your iPod device on the left panel of iTunes, click "Movies" tab, check the videos you want to sync and click "Apply", done.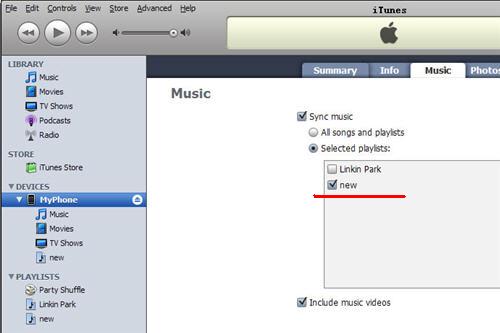
By the way, you can use another useful software – iPod to Computer Transfer, which is made by Aiseesoft. The best iPod to Computer Transfer to help you backup iPod video/audio files to computer, you don’t need to worry about losing anything. If you have any iPod/iPhone device, you can safely play your iPod/iPhone with this iPod Transfer software.
For More info, please visit: http://www.aiseesoft.com/ipod-to-computer-transfer.html
Part3. How to transfer limewire free movie to Zune PSP and iPhone?
2010年11月26日星期五
Apple I Goes for $210,000 at Auction
It won’t connect to the Internet, and it’s definitely not Flash-friendly, but a rare Apple I computer, one of only 200 made, was sold at Christie’s in London today for $210,000. It included the original packaging and a signed sales letter from Steve Jobs. The Apple I was originally available from 1976-77 for $666.66. The buyer, Italian businessman Marco Boglione, will restore it to working condition and add it to his collection of Apple computers.
2010年11月25日星期四
HarperCollins Resolves Lawsuit with Gawker
In a statement, HarperCollins revealed they have resolved their lawsuit against Gawker over a post containing photographed excerpts from Sarah Palin‘s memoir, America by Heart: Reflections on Family, Faith, and Flag.
Over the weekend, a federal judge ordered Gawker to remove the excerpts. UPDATE: The New York Times has more, including a statement from Gawker. Asked about “financial settlement,” a HarperCollins spokesperson “declined to comment.”
2010年11月24日星期三
Every Day’s a Tax Holiday
Apple’s new 11-inch MacBook Air has a list price of $999—that’s what you’ll pay at Apple.com and the Apple store, as well as at Best Buy and other large retailers. At Amazon.com, though, the same model sells at a slightly lower price—$979.
2010年11月22日星期一
How to copy DVD to ISO file for Mac
ISO file is an unattached file format (like RAR and ZIP): it merges a series of files into one single file according to a definite format. So they are stored in an uncompressed format., then it is more practicable to to transfer it over the Internet or via a LAN connection.
There lists the capabilities of DVD Copy for Mac on ISO file:
Copy: the ability to copy DVD to ISO file for Mac.
Burn: the ability to burn ISO file to an optical Disc.
Extract: the ability to copy the content of ISO file to a hard disc.
Free download this DVD Copy for Mac to have a try!
Buy NowFree trial(Intel PPC)Let’s take the example: How to copy DVD to ISO file for Mac
Click “Full Disc ” button or “Main Movie Mode” button on the main interface to select the copy DVD mode.
Select the source: Select the DVD-video disc here to copy your DVD file.
Choose the target: Choose the ISO image target here for copying your DVD files as ISO file.
Start to Copy:Click the “Start” to begin your DVD copying to ISO file on Mac.
learn more on: how to edit DVD file or ISO file with DVD Copy for Mac.
Aiseesoft are making a promotion of “Buy One Get One” in order to express our gratitude and a long-term support during Thanksgiving season. The time is from 22nd Nov to 28th Nov. For more information, please click here: http://www.aiseesoft.com/special/thanksgiving2010.html.
2010年11月21日星期日
How to Make iPhone Ringtone
You bought an iPhone and love all its features, but wish you didn't have to pay for your songs twice to get a ringtone. (We know that iPhone, iPhone 3G Ringtones use the file extension .M4R. And the users must pay $2 for a piece of song through Apple iTunes store). There are plenty of songs in your music library, but no way to make ringtones from any of them. Rihgt?
Actually, with a little bit of trickery (nothing illegal) you can create ringtones from any one of your non-DRM songs.
This works on both Mac and Windows PCs.
Window Users
You can create free iPhone Ringtones by yourself with Aiseesoft iPhone Ringtone Maker.
You can take the following step-by-step instructions to start.
Step 0: Download and install Aiseesoft iPhone Ringtone Maker.
After a short while, you can see the following interface:
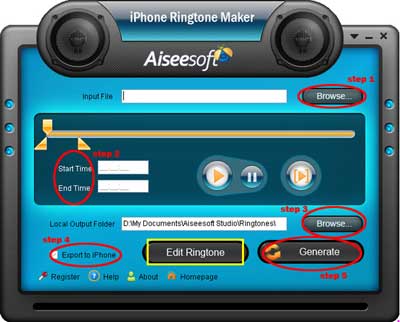
Step 1: Click "Browse" on the right side of "Input File" to import the file that you want to make ringtone from it.
Step 2: Play it and listen the music to find the segment that you want to use it as ringtone. Then drag and click the start & end slider to set your wanted segment, or type the start & end time in the corresponding text box directly to get the exact segment. You also can pre-listen the converted audio before generate.
Step 3: Click "Browse" on the right side of "Local Output Folder" to choose the output destination.
Step 4: Check "Export to iPhone" option, the converted ringtone will be load to your iPhone directly.
Step 5: After all the settings are finished, click "Generate" to begin making your own iPhone ringtone.
Key function
* Convert any video to iPhone ringtone M4R
* Create iPhone ringtone from any audio files
* Get any clips from video and audio
* Edit Added iPhone ringtones
Using Aiseesoft iPhone Ringtone Maker, you are free to edit the added iPhone ringtone by removing it or renaming it directly.
For Mac Users, please go to Aiseesoft iPhone Ringtone Maker for Mac.
2010年11月19日星期五
New iPod touch 2G Guide
A big surprise turn up at 9th Sep for all iPod fans – the new iPod touch 2G and Nano 4G released. It’s really lucky and exciting to get a new iPod Touch 2G. And in order to help iPod users to learn more about it, I collected some information for this new iPod touch 2G guide. And it also includes how to enjoy the multimedia on you new iPod touch 2G such as download free video to iPod, convert DVD to iPod and transfer music video from iPod to iPod and iPod to computer.
Price:
As expected, the biggest news with Apple's second-generation iPod Touch is its drastically reduced price. The 8GB version of the iPod Touch 2G is now $229 (down from $299), the 16GB is $299 (down from $399), and the 32GB is $399 (down from $499).
Size:
The new iPod touch 2G is smaller and lighter than the original, 3.5 inch touch-screen, measuring 4.1 by 2.4 by 0.33 inches and weighing 4.05 ounces. With its rounded edges, flush display and curved, more compact design, the iPod touch 2G is promised to be more comfortable to hold and more portable than ever.
Game:
iPod touch 2G users can choose from hundreds of gaming titles such as "Spore Origins" and "Scrabble" from Electronic Arts, and "Real Football 2009" from Gameloft available on iTunes or directly through the App Store application on the iPod touch. The App Store works over Wi-Fi, enabling users to browse, purchase and wirelessly download applications.
Battery and “Genius”
The new iPod touch 2G promises up to 36 hours of music playback or six hours of video playback on a single charge. It also works with the new iTunes 8 Genius feature, allowing users to automatically create playlists while on the go. These playlists can also be synchronized with iTunes 8 servers.
Others features in new iPod touch 2G
Build-in accelerometer for casual listening; more convenient volume control button on the edge; the newest improvements “Nike+iPod” which can help you track your workouts by slipping a Nike+iPod sensor into you Nike+ shoes.
Then, Let’s talk about how to enjoy multimedia on your New iPod touch 2G
Part 1: How to free download video to your new iPod Touch 2G.
I always download free video and music from Youtube and limewire.
Youtube streaming videos are all FLV formats, so you need to play the video with a flash player programe on your computer, and if you want to put them on your new iPod touch 2G, use a iPod video Converter to convert FLV to MP4 format.
I got this totally free Youtube downloader, just enjoy.
http://www.aiseesoft.com/free-youtube-downloader.html
Limewire is a fast and popular freeware working on Windows, Linux and Mac OS. Through the P2P (peer-to-peer) network, you can free download various video and audio files by keywords searching. Most of its video formats is MPEG, so convert them and transfer to your iTunes then iPod touch 2G.
http://www.limewire.com/
Part 2: How to convert DVD to iPod Touch 2G
The new iPod touch 2G can only play MP4 and H.264 video, but DVD movie is MEPG, MPEG-2 video and CSS protected, so you need an application to convert DVD to MP4 video, then sync it to iPod touch 2G via iTunes.
To complete Part 1 and Part 2 I recommend you an iPod studio pack which includes a DVD to iPod converter and video to iPod converter.
You can get familiar with the apps by using this detailed step by step guide:
http://www.aiseesoft.com/article/download-dvd-pdf-youtube-videoto-ipod.html
Part 3: How to convert files back to your computer and transfer between iPod
Because iTunes prevents you from copying music or video from the iPod touch 2G back to computer, so you need a special tool to do that.
Yamipod, Aiseesoft iPod to Computer Transfer, Sharepod, iDump
And then re-add it to your iTunes library and sync it to other iPod touch 2G.
Free Trial: Free download Aiseesoft DVD to iPod Suite
view the datail of ipod nano chromatic/touch 2 converter
2010年11月15日星期一
Beatles Music Coming to Apple’s iTunes Store
Steve Jobs is nearing the end of his long and winding pursuit of the Beatles catalog. Apple Inc. is preparing to announce that its iTunes Store will soon start carrying music by the Beatles, according to people familiar with the situation, a move that would fill in a glaring gap in the collection of the world’s largest music retailer.
The deal resulted from talks that were taking place as recently as last week among executives of Apple, representatives of the Beatles and their record label, EMI Group Ltd., according to these people, who also warned that there is still a chance that Apple could change plans at the last minute.
Watchdog Planned for Online Privacy
The Obama Administration is preparing a stepped-up approach to policing Internet privacy that calls for new laws and the creation of a new position to oversee the effort, according to people familiar with the situation.
The strategy is expected to be unveiled in a report being issued by the U.S. Commerce Department in coming weeks, these people said. The report isn’t yet final and could change, these people said.
In a related move, the White House has created a special task force that is expected to help transform the Commerce Department recommendations into policy, these people said. The White House task force, set up three weeks ago, is led by Cameron Kerry, the brother of Sen. John Kerry (D., Mass.) and Commerce Department general counsel, and Christopher Schroeder, assistant attorney general at the Department of Justice.
The initiatives would mark a turning point in Internet policy. Recent administrations typically steered away from Internet regulations out of concern for stifling innovation. But the increasingly central role of personal information in the Internet economy helped spark government action, according to people familiar with the situation.
2010年11月14日星期日
When Good News Is Bad News: Google Reportedly Fires Raise Leaker
Some corporate memos are confidential.
And some memos are “confidential”–meaning there’s no real expectation that they’ll stay within the family.
You’d assume that Eric Schmidt’s memo to “Googlers” announcing big raises falls in the latter category. If that’s all Googlers, that’s some 23,300 people, so that’s pretty much the same thing as issuing a press release, right?
But Google thinks otherwise, says CNNMoney’s David Goldman. He reports that the company has fired an engineer who passed the information along to Business Insider yesterday:
Within hours, Google notified its staff that it had terminated the leaker, several sources told CNNMoney. A Google spokesman declined to comment on the issue, or on the memo.
I’ve gone ahead and asked Google for comment as well, but I’m not hopeful. (UPDATE: I can see the future! No comment from Google.) In the absence of one, I’ll speculate that Google was freaked out that the “leak” would cause it problems with Wall Street and/or the SEC.
But again, if that’s the case, that makes no sense–you can’t hand out big fat checks to 23,300 people and keep it quiet indefinitely.
And since the point of the raises is to keep Googlers happy in a hot job market–and presumably, to help recruit new Googlers–you’d think Google would want the “confidential” memo distributed. Right?
I gather that some of you agree with Google on this one. Since the company won’t talk, feel free to make their case for them in the comments below.
2010年11月11日星期四
How to reformat an iPod
This is a tutorial about how to reformat Windows Formatted iPod for Mac and how to reformat Mac Formatted iPod for Windows. There are 2 parts:
Part 1. How to reformat Windows Formatted iPod for Mac
Part 2. How to reformat Mac Formatted iPod for Windows
The way you see if an iPod is Mac or Windows-ready is to go to Settings --> About and scroll to the bottom of the screen. If it's formatted for Mac OS X, then the last item will be the serial number of the iPod. If it's Windows-ready, then after the serial number will be "Format: Windows". Simple enough, if a bit obscure.
If you wish to keep the songs you have on the iPod, you must first follow this tutorial to backup your iPod files to your computer.
Part 1, How to reformat Windows Formatted iPod for Mac
Step 1 Launch iTunes by selecting its icon in the dock
Step 2 Connect your iPod to the computer. Once it shows up in iTunes press the Restore button under the Summary Tab.
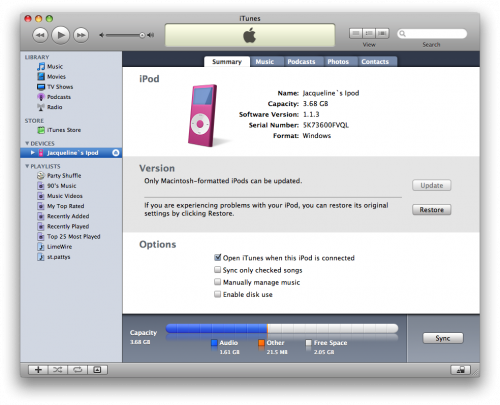
Step 3 A popup will appear warning you that all the songs on your iPod will be erased. Click the Restore button.
Step 4 An iPod Software Update window will open. Click the Next button.
Step 5 Click the Agree button to accept the license agreement.
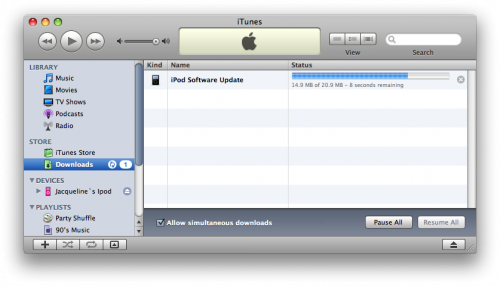
Step 6 iTunes will now go and download the latest firmware for your iPod.
Step 7 Once installation begins it will ask you for an Administrator's username and password. Enter this information then click the OK button.
Step 8 iTunes will then format and update your iPod after which it will reboot.
Step 9 Once complete you will be asked to name your iPod. Do this then press the Done button.
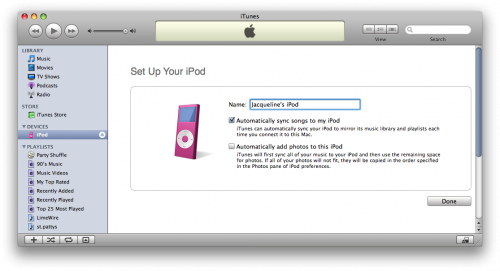
Step 10 iTunes will now automatically begin syncing your library to the iPod!
Part2. How to reformat Mac Formatted iPod for Windows
Step 1, Download the latest version of iTunes
Your first step should be to ensure that you have the very latest version of iTunes. You can do that by going to Download iTunes. Install that, and when you hook up your iPod, you should see it show up in iTunes, then when you click on the iPod on the left side of iTunes, you'll get to the summary screen.
Step2 , Click the "Restore" button and you should be prompted to choose between four different options:
Restore Option 1: Restore - Restores with same iPod Software version already on iPod.
Restore Option 2: Use Same Version - Restores with same iPod Software version already on iPod even though a newer version is available.
Restore Option 3: Use Newest Version - Restores with the latest iPod Software available.
Restore Option 4: Restore and Update - Restores with the latest iPod Software available.
Part 1. How to reformat Windows Formatted iPod for Mac
Part 2. How to reformat Mac Formatted iPod for Windows
The way you see if an iPod is Mac or Windows-ready is to go to Settings --> About and scroll to the bottom of the screen. If it's formatted for Mac OS X, then the last item will be the serial number of the iPod. If it's Windows-ready, then after the serial number will be "Format: Windows". Simple enough, if a bit obscure.
If you wish to keep the songs you have on the iPod, you must first follow this tutorial to backup your iPod files to your computer.
Part 1, How to reformat Windows Formatted iPod for Mac
Step 1 Launch iTunes by selecting its icon in the dock
Step 2 Connect your iPod to the computer. Once it shows up in iTunes press the Restore button under the Summary Tab.
Step 3 A popup will appear warning you that all the songs on your iPod will be erased. Click the Restore button.
Step 4 An iPod Software Update window will open. Click the Next button.
Step 5 Click the Agree button to accept the license agreement.
Step 6 iTunes will now go and download the latest firmware for your iPod.
Step 7 Once installation begins it will ask you for an Administrator's username and password. Enter this information then click the OK button.
Step 8 iTunes will then format and update your iPod after which it will reboot.
Step 9 Once complete you will be asked to name your iPod. Do this then press the Done button.
Step 10 iTunes will now automatically begin syncing your library to the iPod!
Part2. How to reformat Mac Formatted iPod for Windows
Step 1, Download the latest version of iTunes
Your first step should be to ensure that you have the very latest version of iTunes. You can do that by going to Download iTunes. Install that, and when you hook up your iPod, you should see it show up in iTunes, then when you click on the iPod on the left side of iTunes, you'll get to the summary screen.
Step2 , Click the "Restore" button and you should be prompted to choose between four different options:
Restore Option 1: Restore - Restores with same iPod Software version already on iPod.
Restore Option 2: Use Same Version - Restores with same iPod Software version already on iPod even though a newer version is available.
Restore Option 3: Use Newest Version - Restores with the latest iPod Software available.
Restore Option 4: Restore and Update - Restores with the latest iPod Software available.
订阅:
评论 (Atom)